iOS Native SDK
validic_ios_native_1.16.3
Legacy (v1) vs Inform (v2)
The same Validic Mobile SDKs are used by both Legacy (v1) and Inform (v2) API customers. To make the documentation easier to access, the Mobile Getting Started Guides and class documentation are hosted on our Inform (v2) documentation site.
The API documentation, however, is different between Legacy (v1) and Inform (v2). If you are an Inform (v2) API customer, you must use the Inform API documentation.
If you are a Legacy (v1) API customer, be sure to go back to the Legacy API documentation.
Requirements
To get started, download the iOS framework from the Validic Mobile portal.
The Validic Mobile libraries support iOS 16 and above and can be used with Xcode 14 or greater.
Installation
Frameworks
Starting with version 1.12.12 of the Validic iOS SDK, each framework is distributed as both as .xcframework and .framework. When working with the .framework distribution you must also add the copy-validicmobile.rb file into the same folder as the frameworks and add a Run Script phase. See Adding a Run Script Phase section below for more instructions.
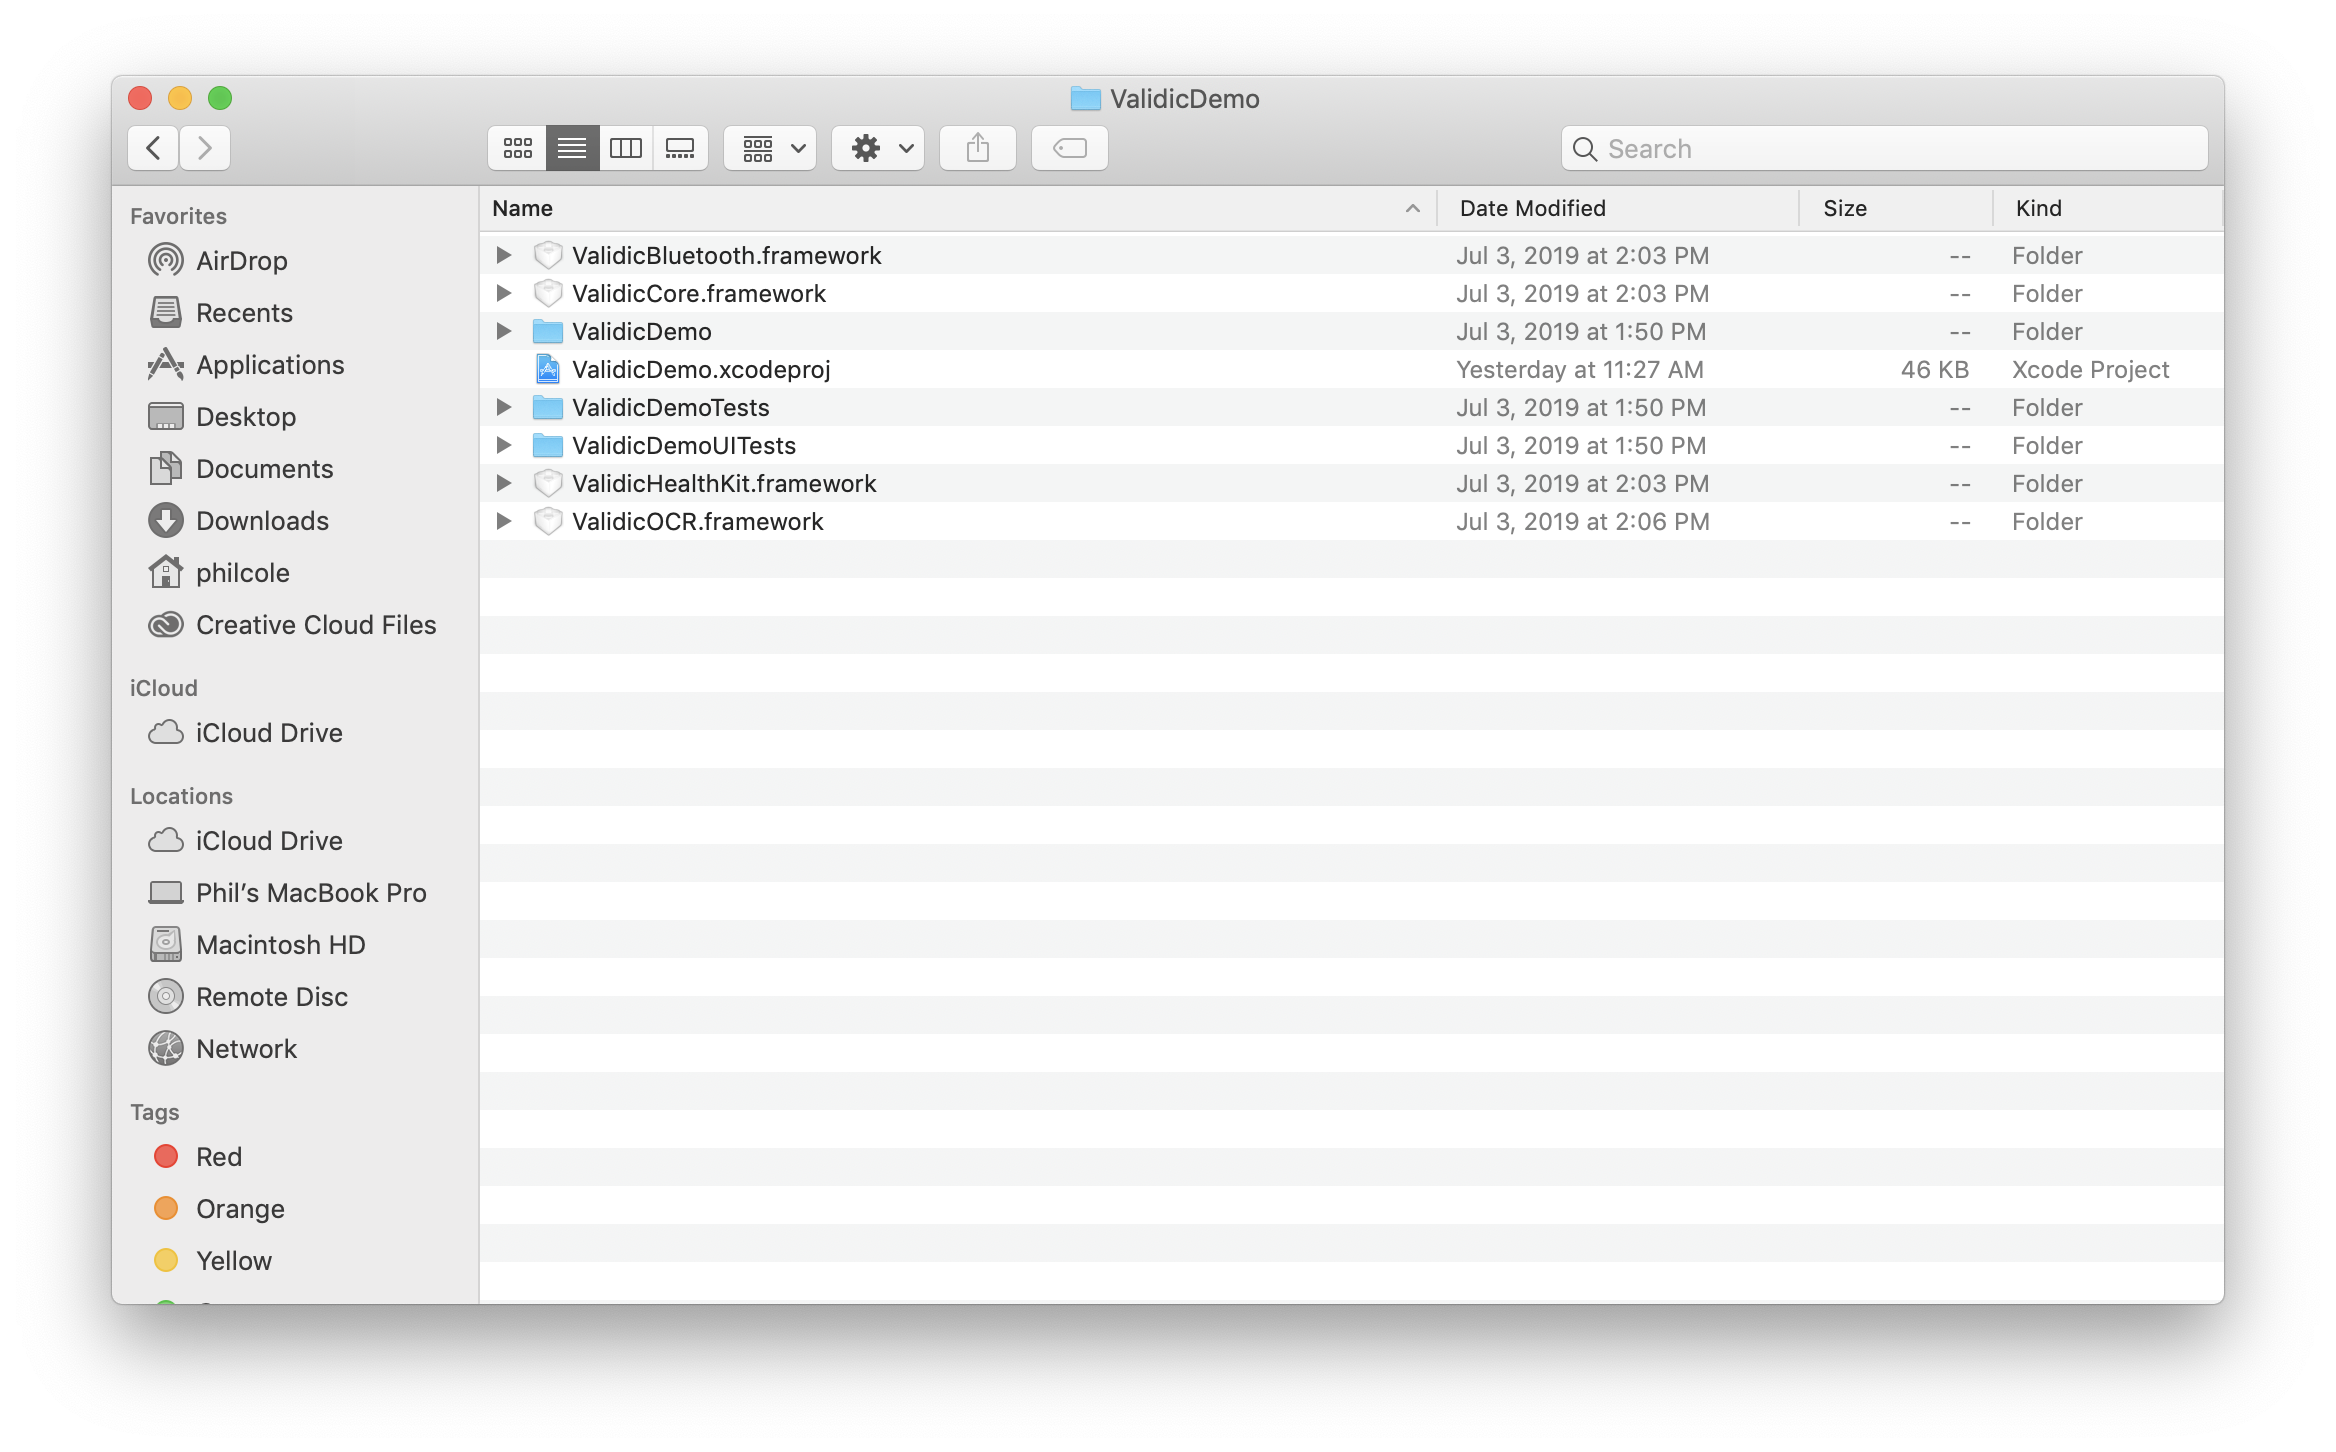
If you are using the demo SDK that was provided to you by the Validic Sales team, copy ValidicCore, ValidicBluetooth, ValidicHealthKit, and ValidicOCR files to the same folder where your Xcode project file (xcodeproj) is located.
In Xcode, open your project and select your target.
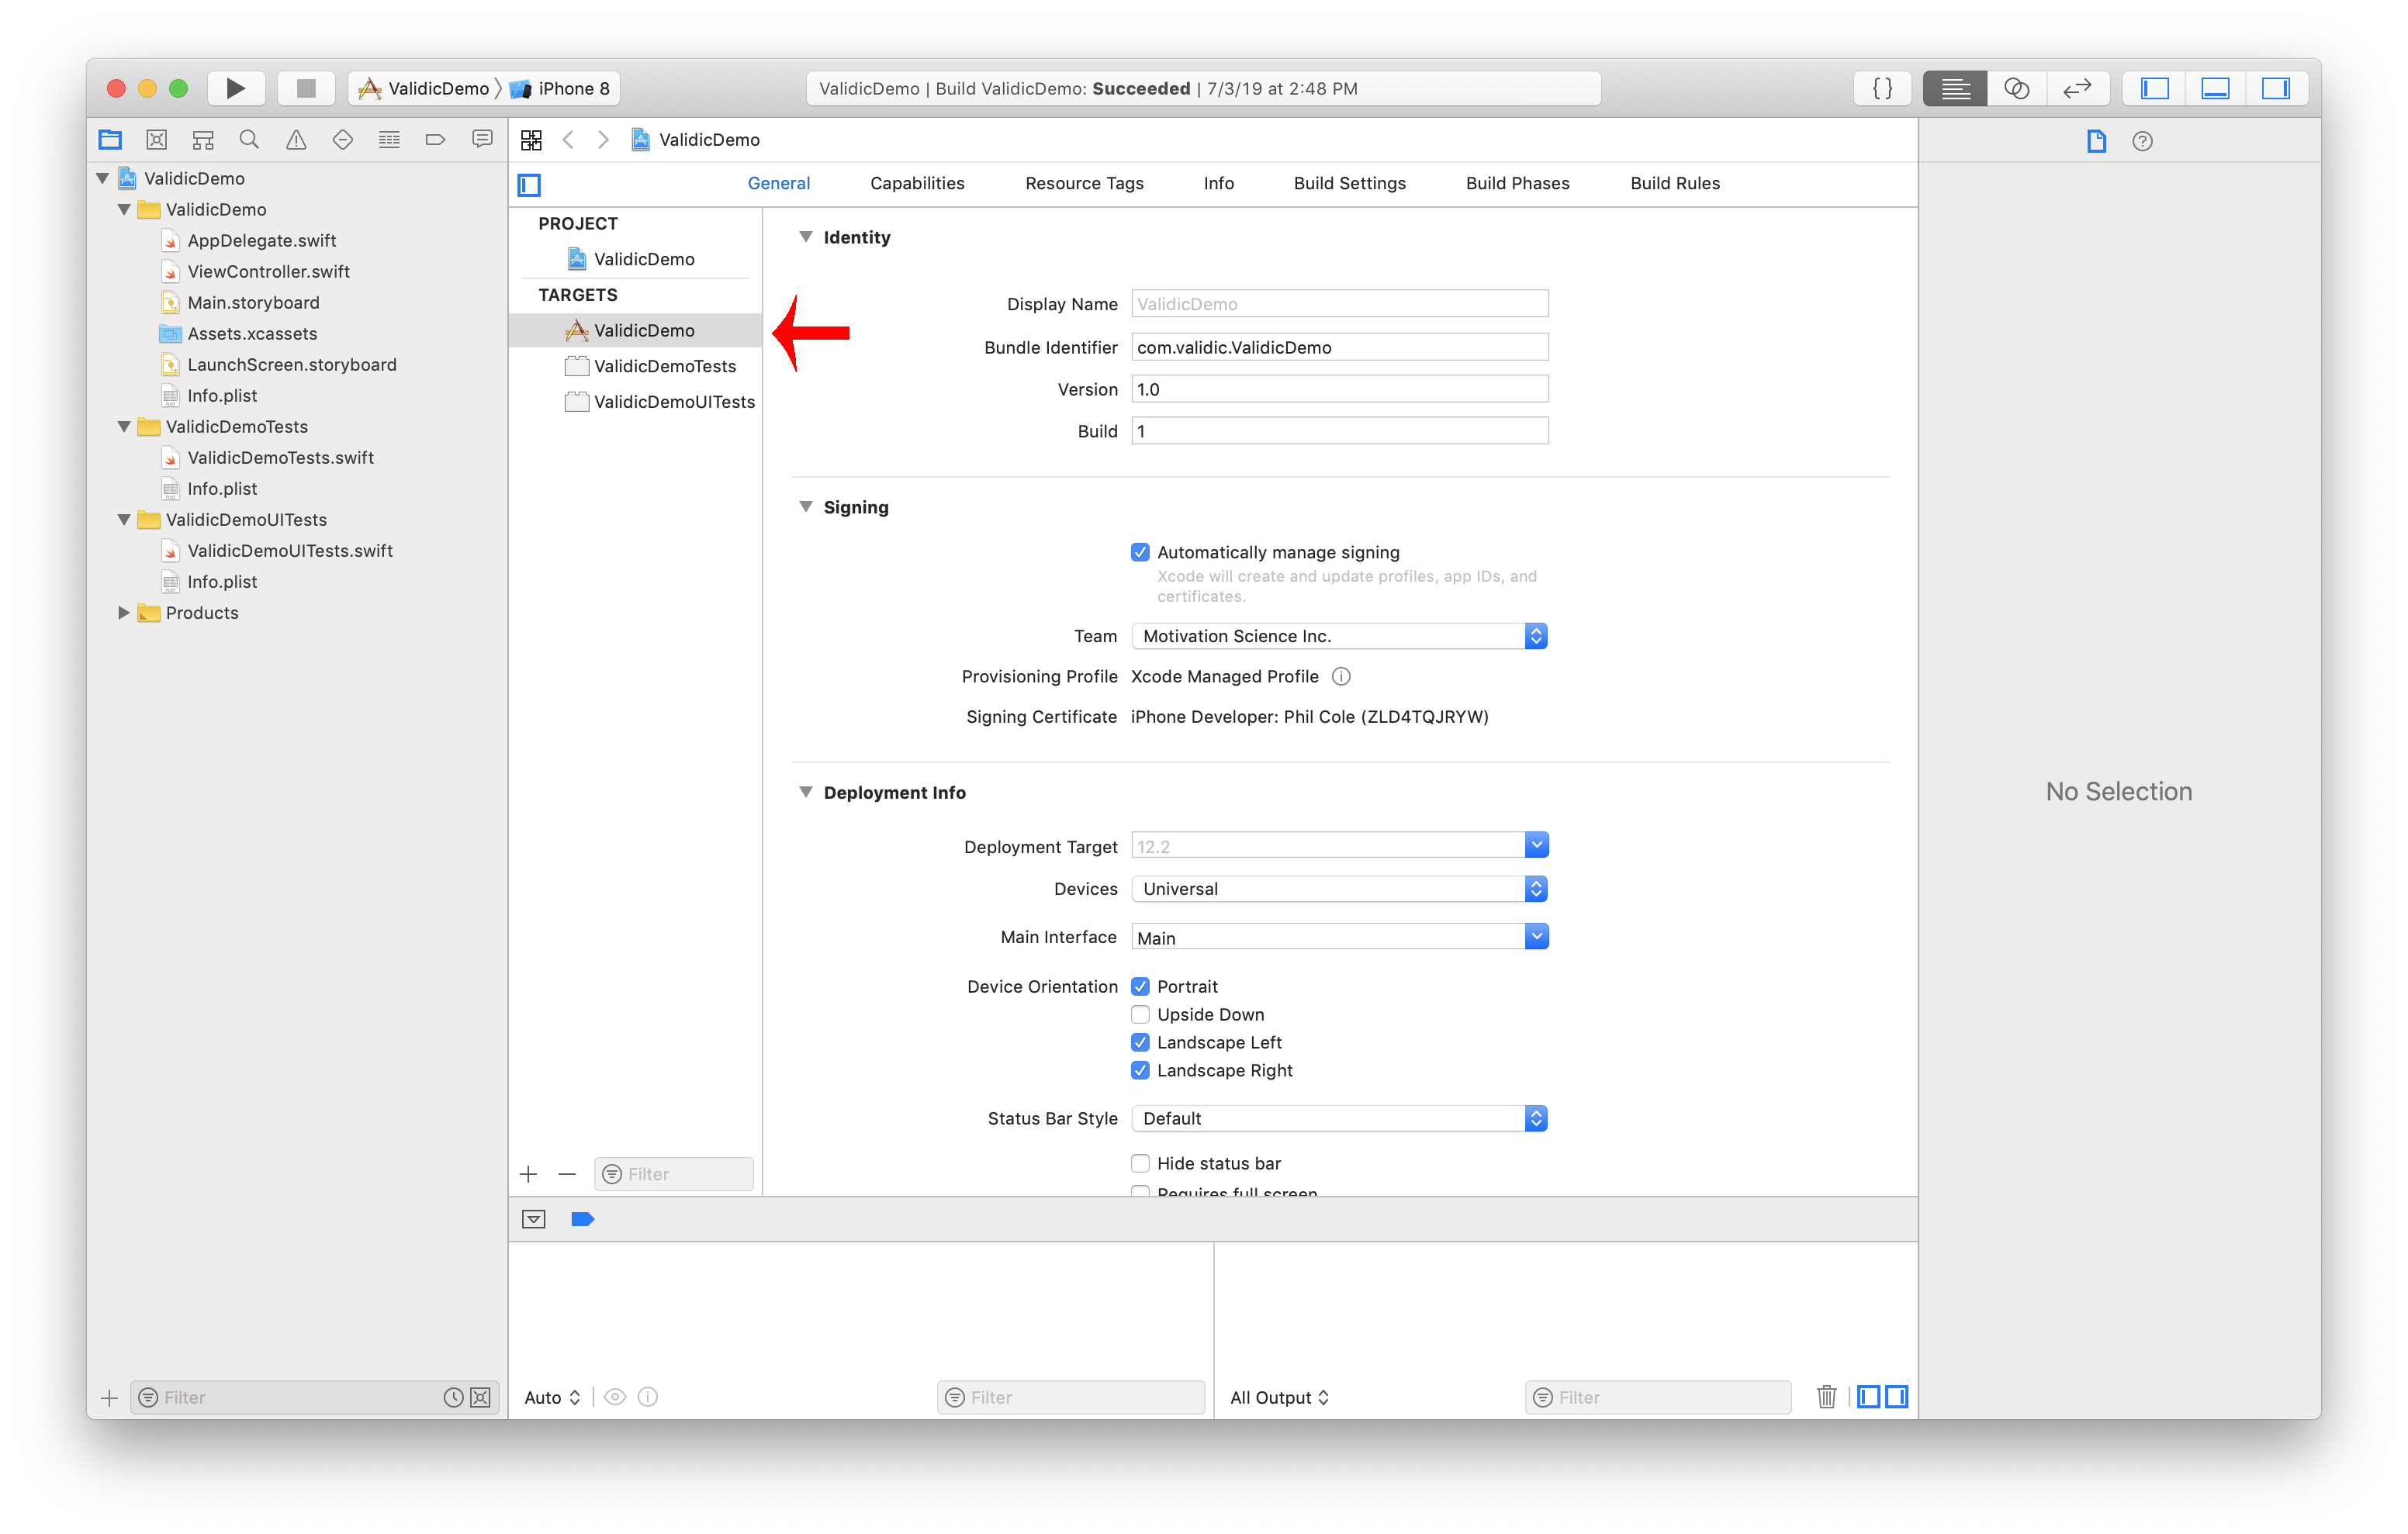
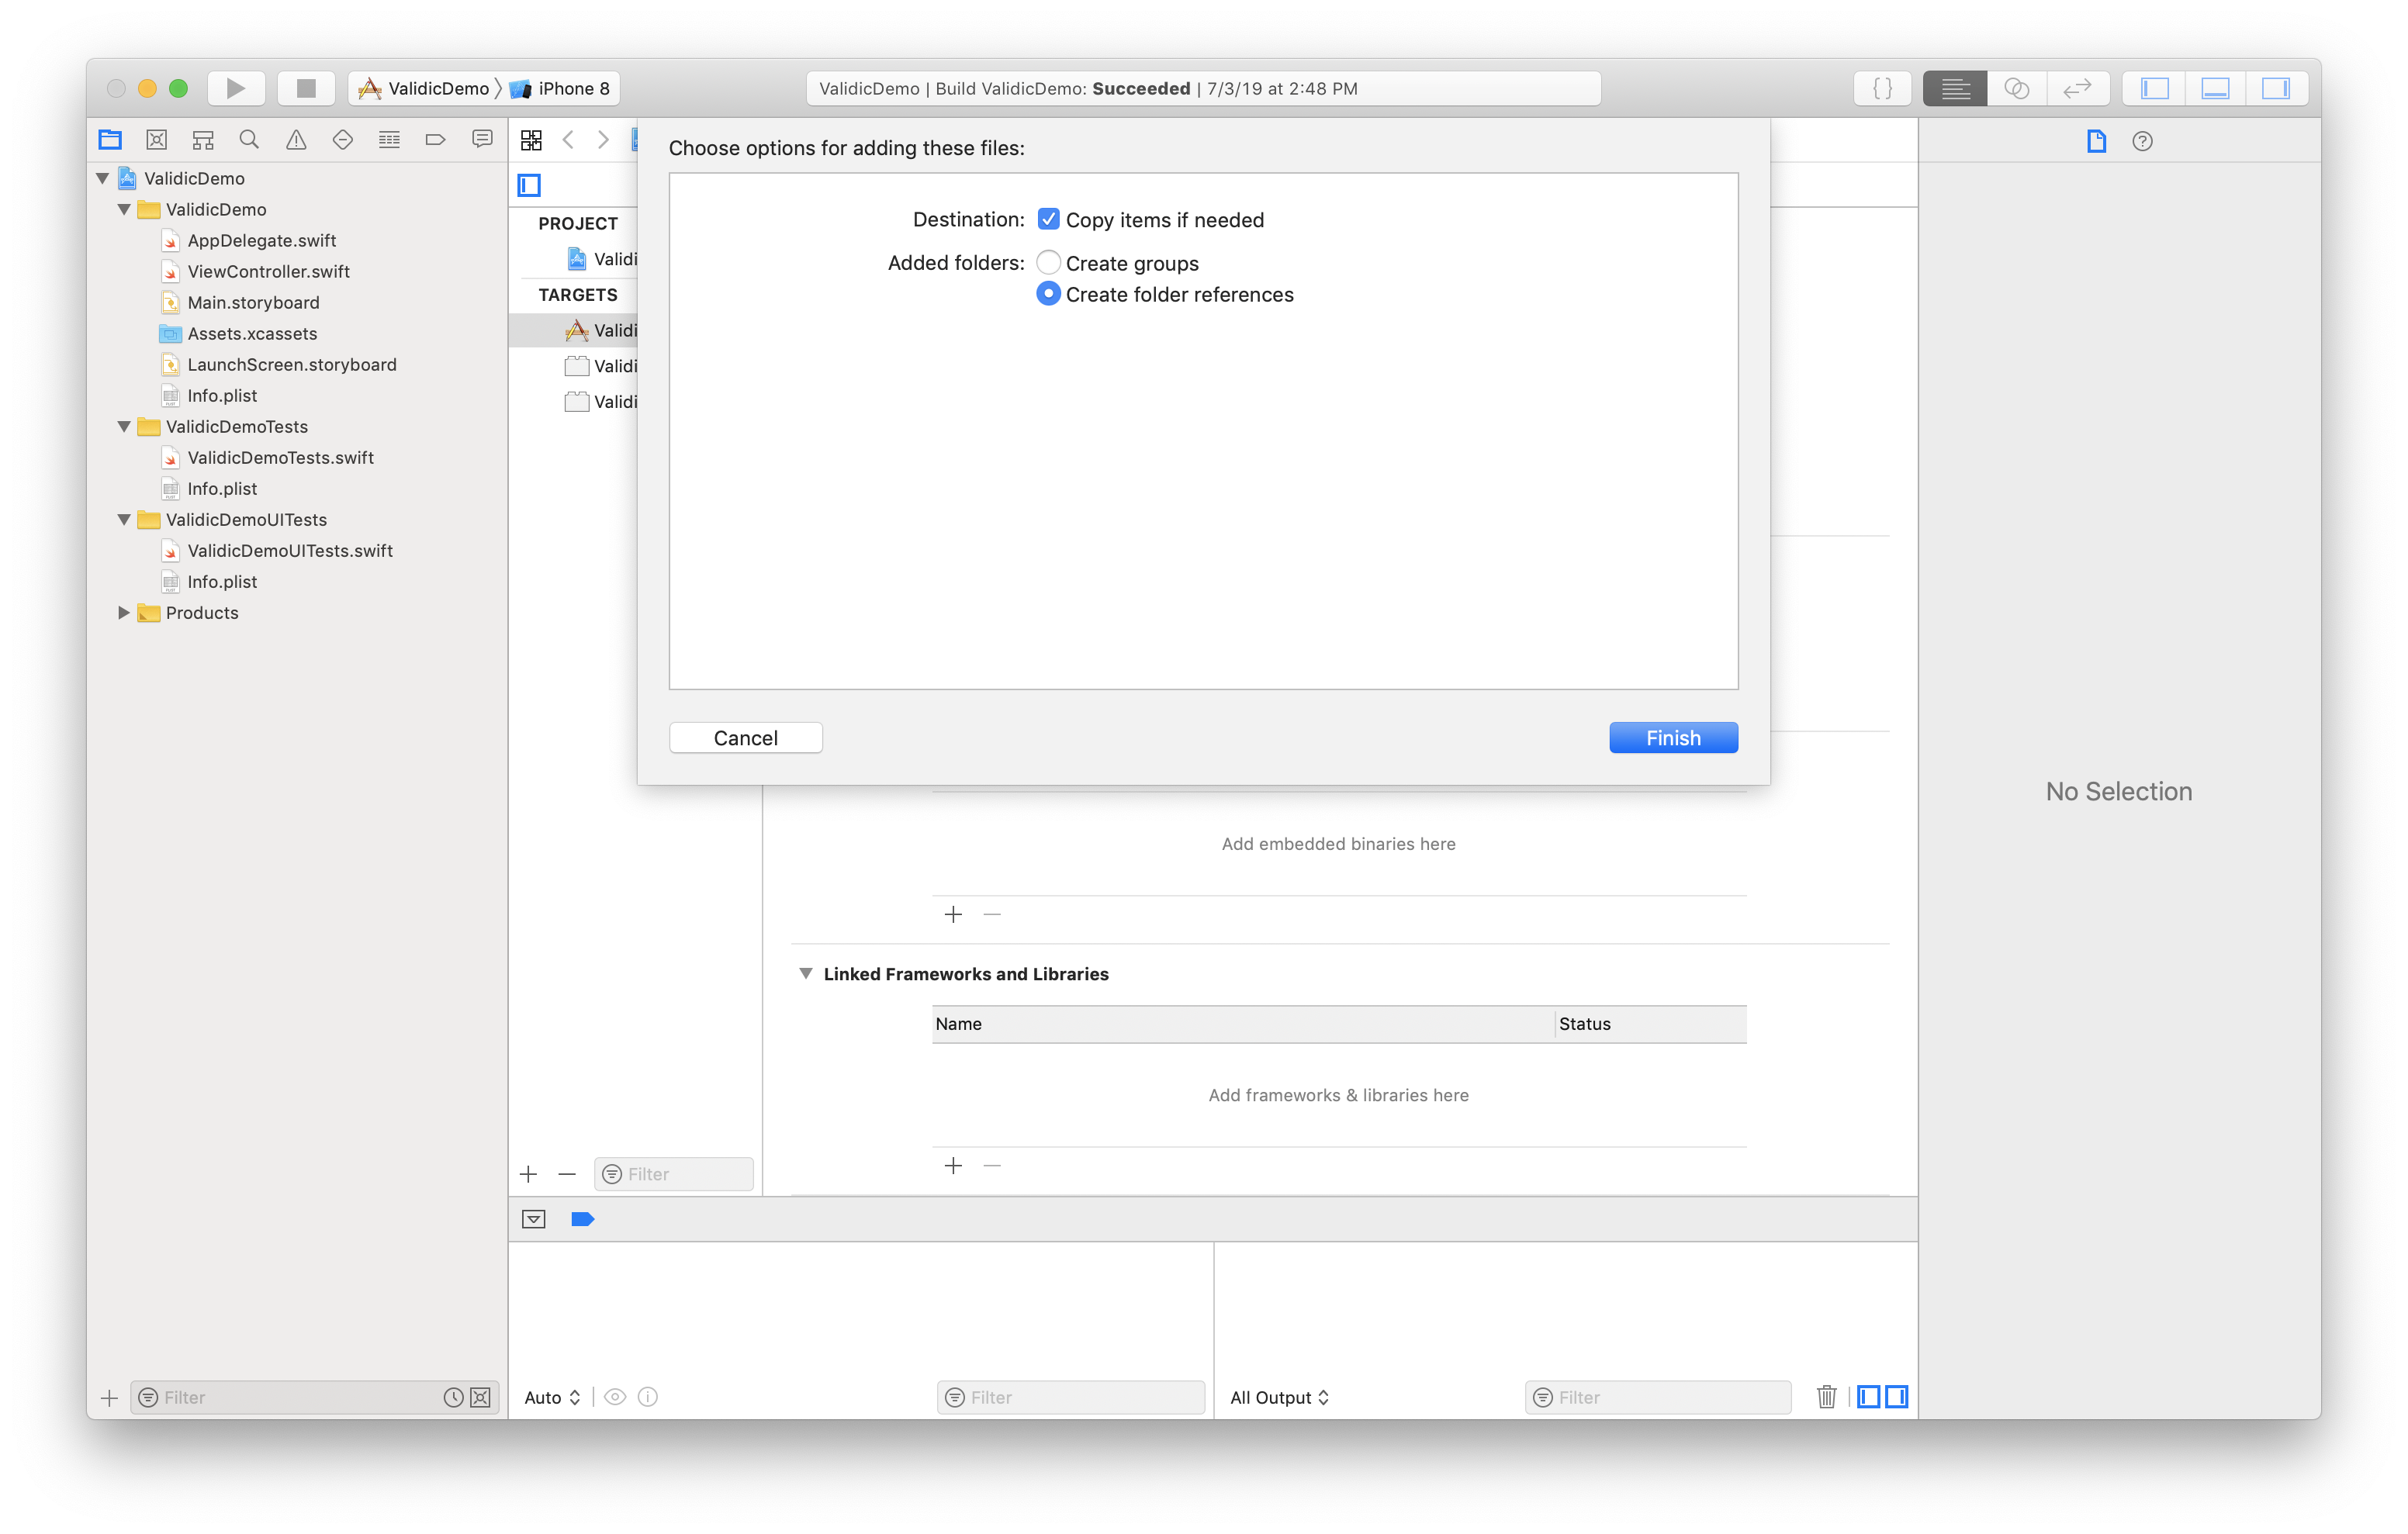
In the General tab there will be two sections at the bottom of the screen labeled Linked Frameworks and Libraries and Embedded Binaries. Add the frameworks to the project by clicking the + button under the Embedded Binaries section.
Select Add Other.. from the drop down menu.
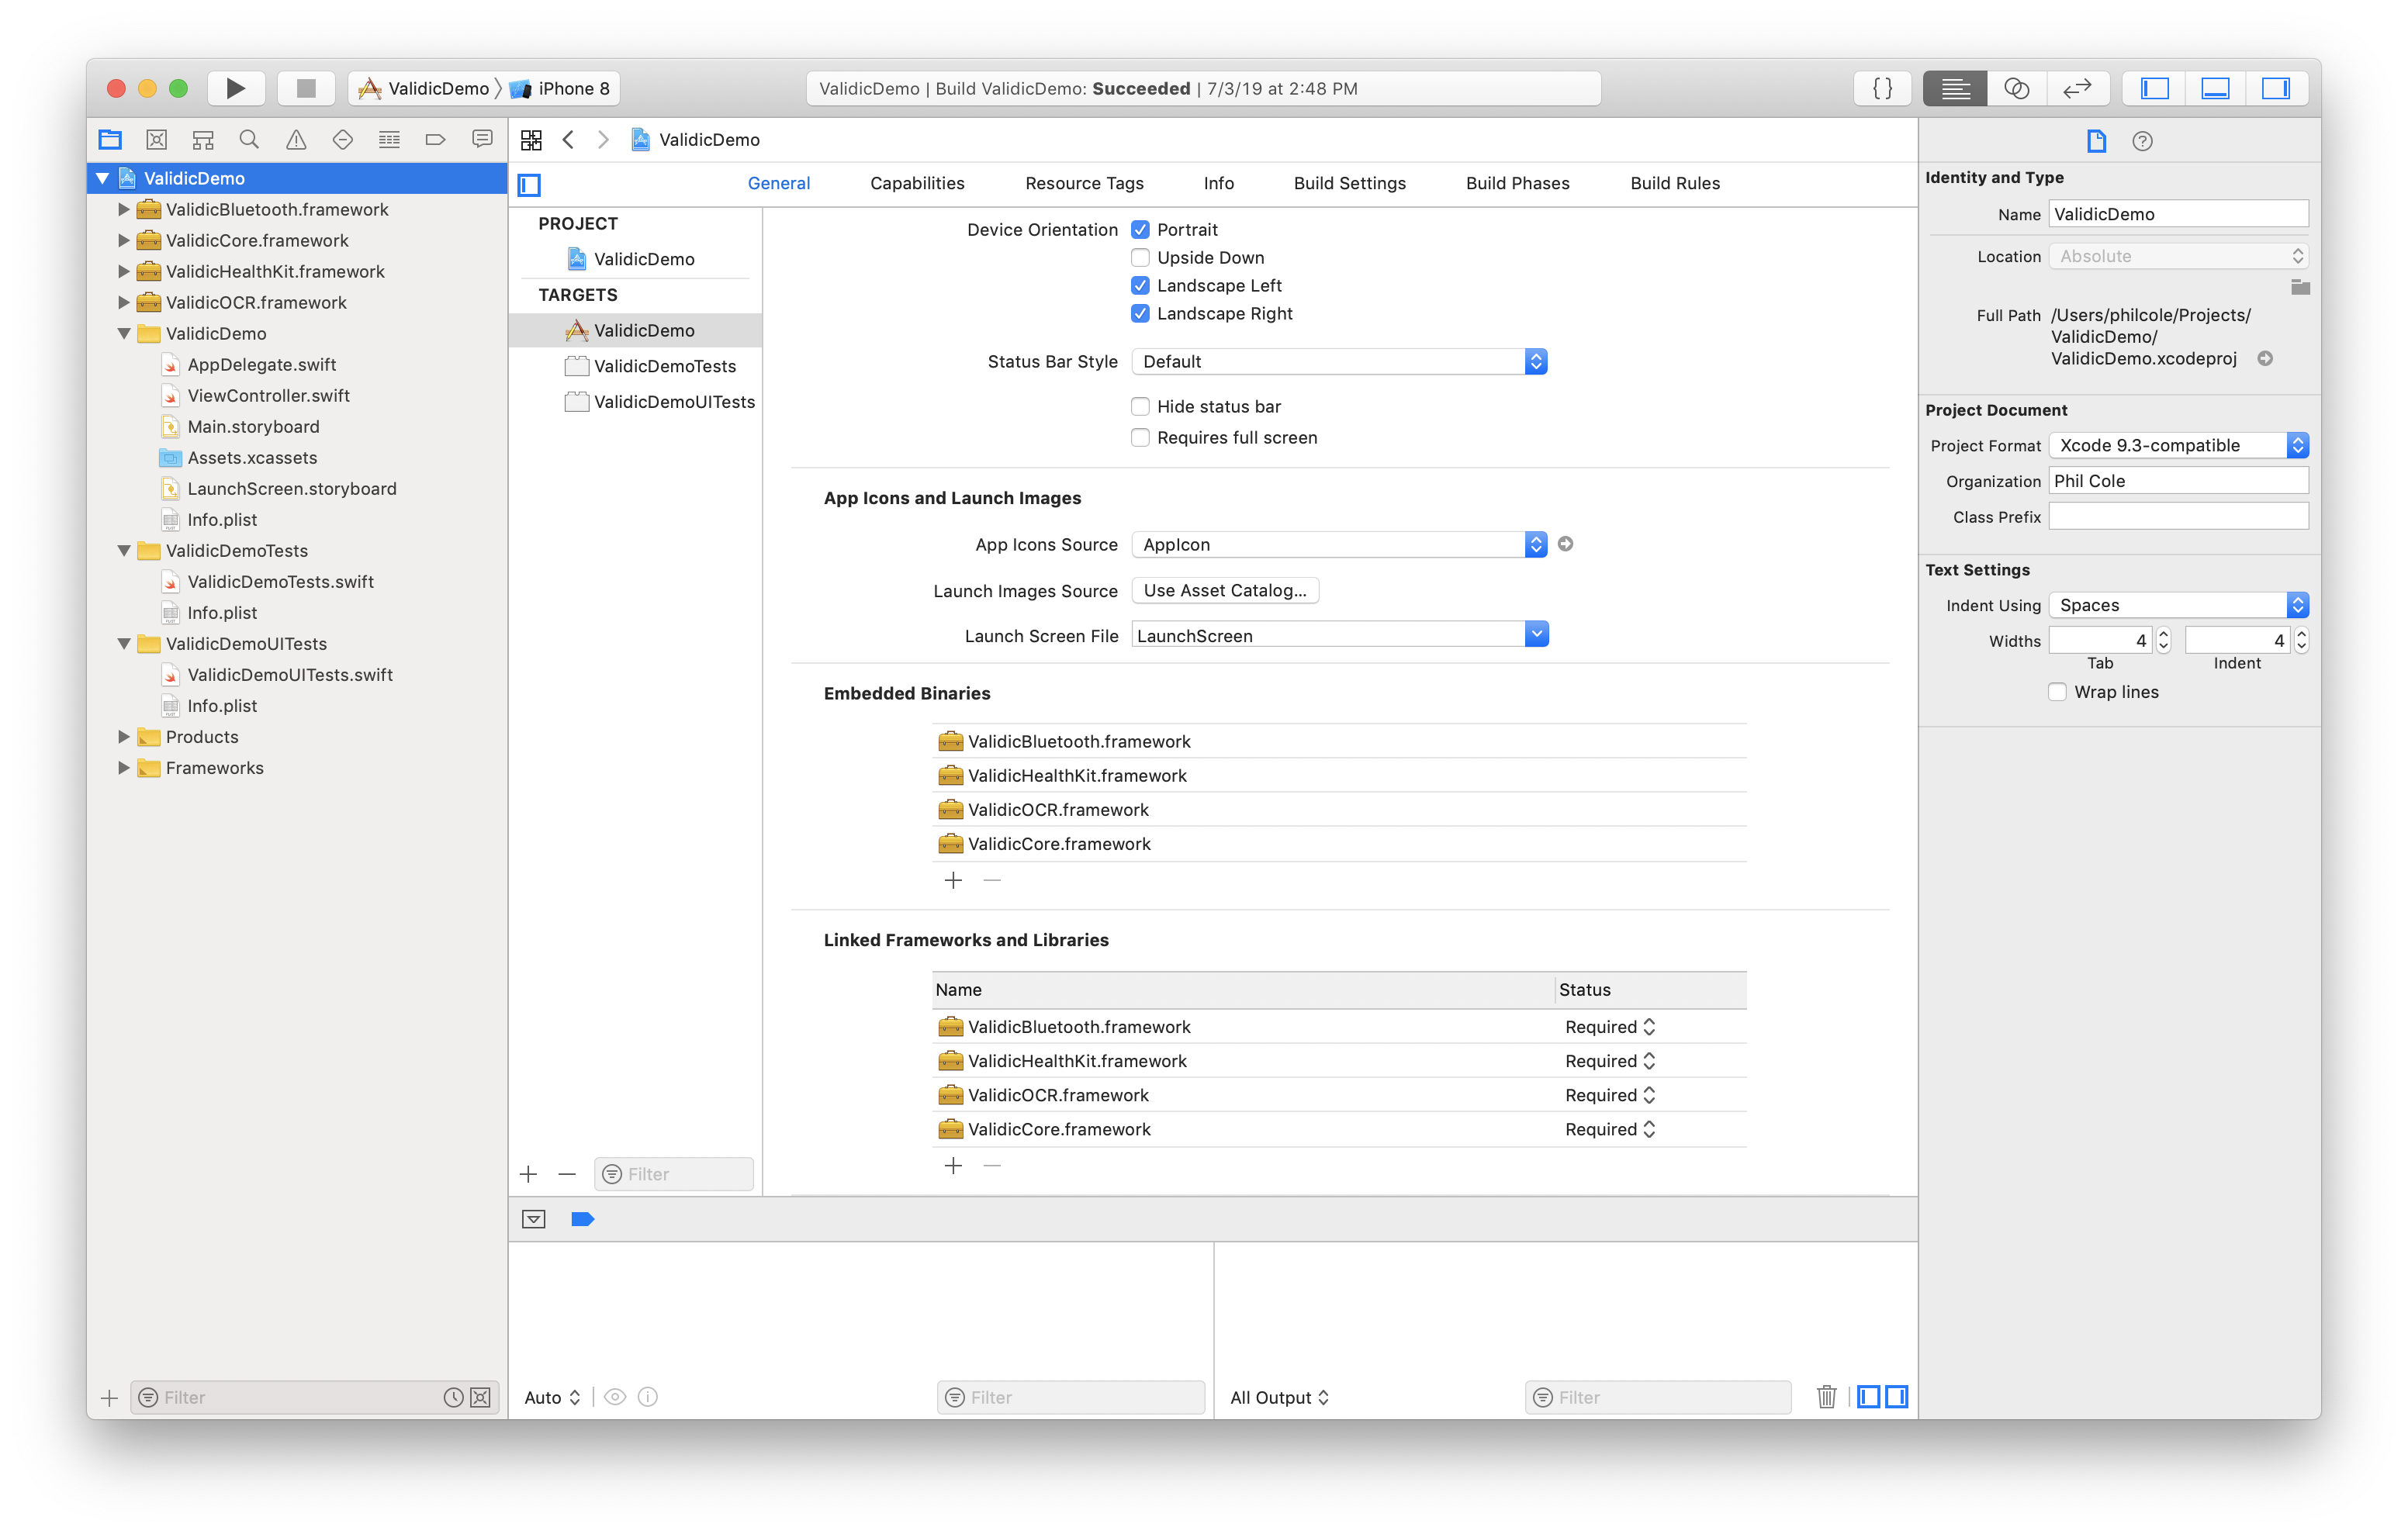
You should now see each framework added under Linked Frameworks and Libraries, Embedded Binaries and in the file browser on the left. Your project should look like the image below after importing the frameworks to the Xcode project.
Add Build Phase
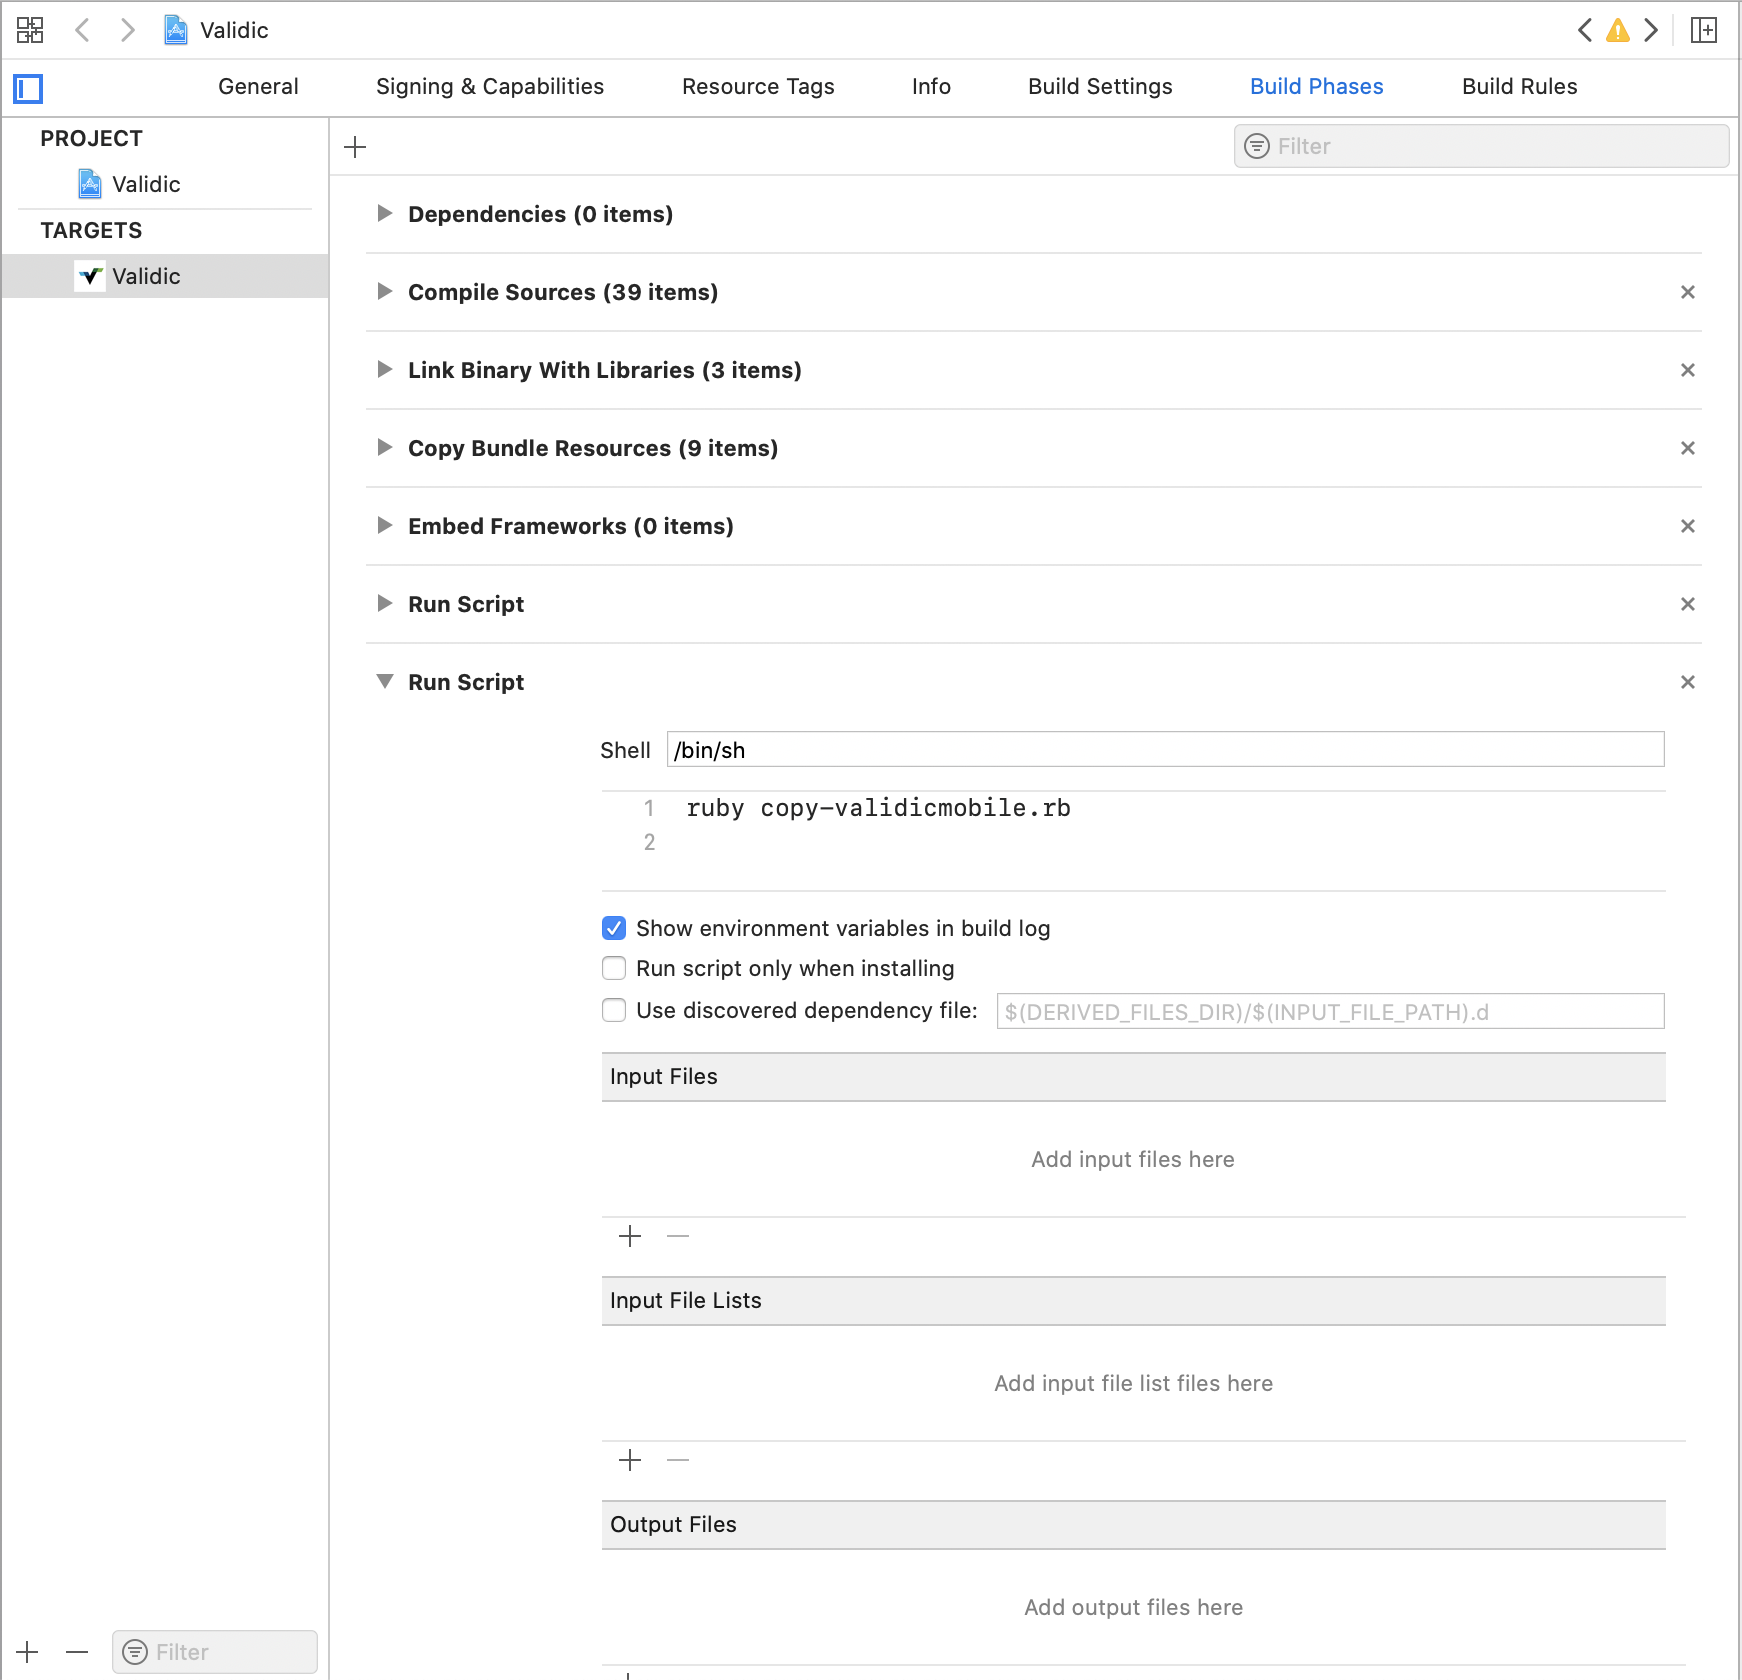
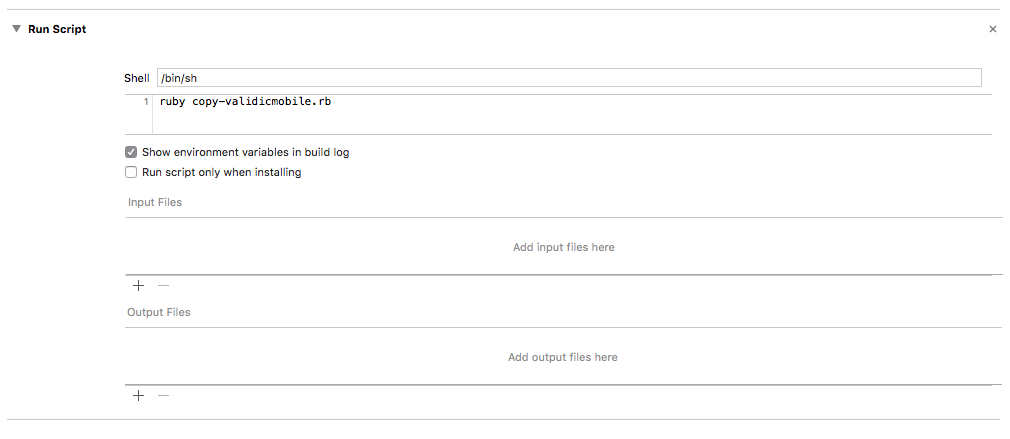
In the “Build Phases” tab add a new build phase by clicking the + button at the top and selecting “New Run Script Phase”.

In the new phase’s text area paste in ruby copy-validicmobile.rb.
NOTE: The order of build phases is very important. Make sure the run script phase is last in Build Phases tab.
Bridging with Swift
To use the frameworks with Swift, you will need to add a Bridging Header. In Xcode go to the File menu and under New select File (cmd+N). In the New File dialog box choose “Header File”.
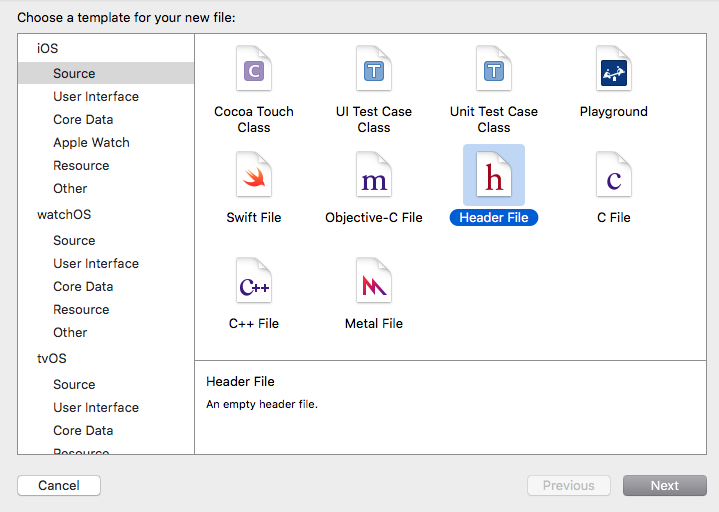
Name the header file “[ProjectName]-Bridging-Header.h”.
Select ProjectName-Bridging-Header.h and add the following lines
#import <ValidicCore/ValidicCore.h>
#import <ValidicBluetooth/ValidicBluetooth.h>
#import <ValidicOCR/ValidicOCR.h>
#import <ValidicHealthKit/ValidicHealthKit.h>
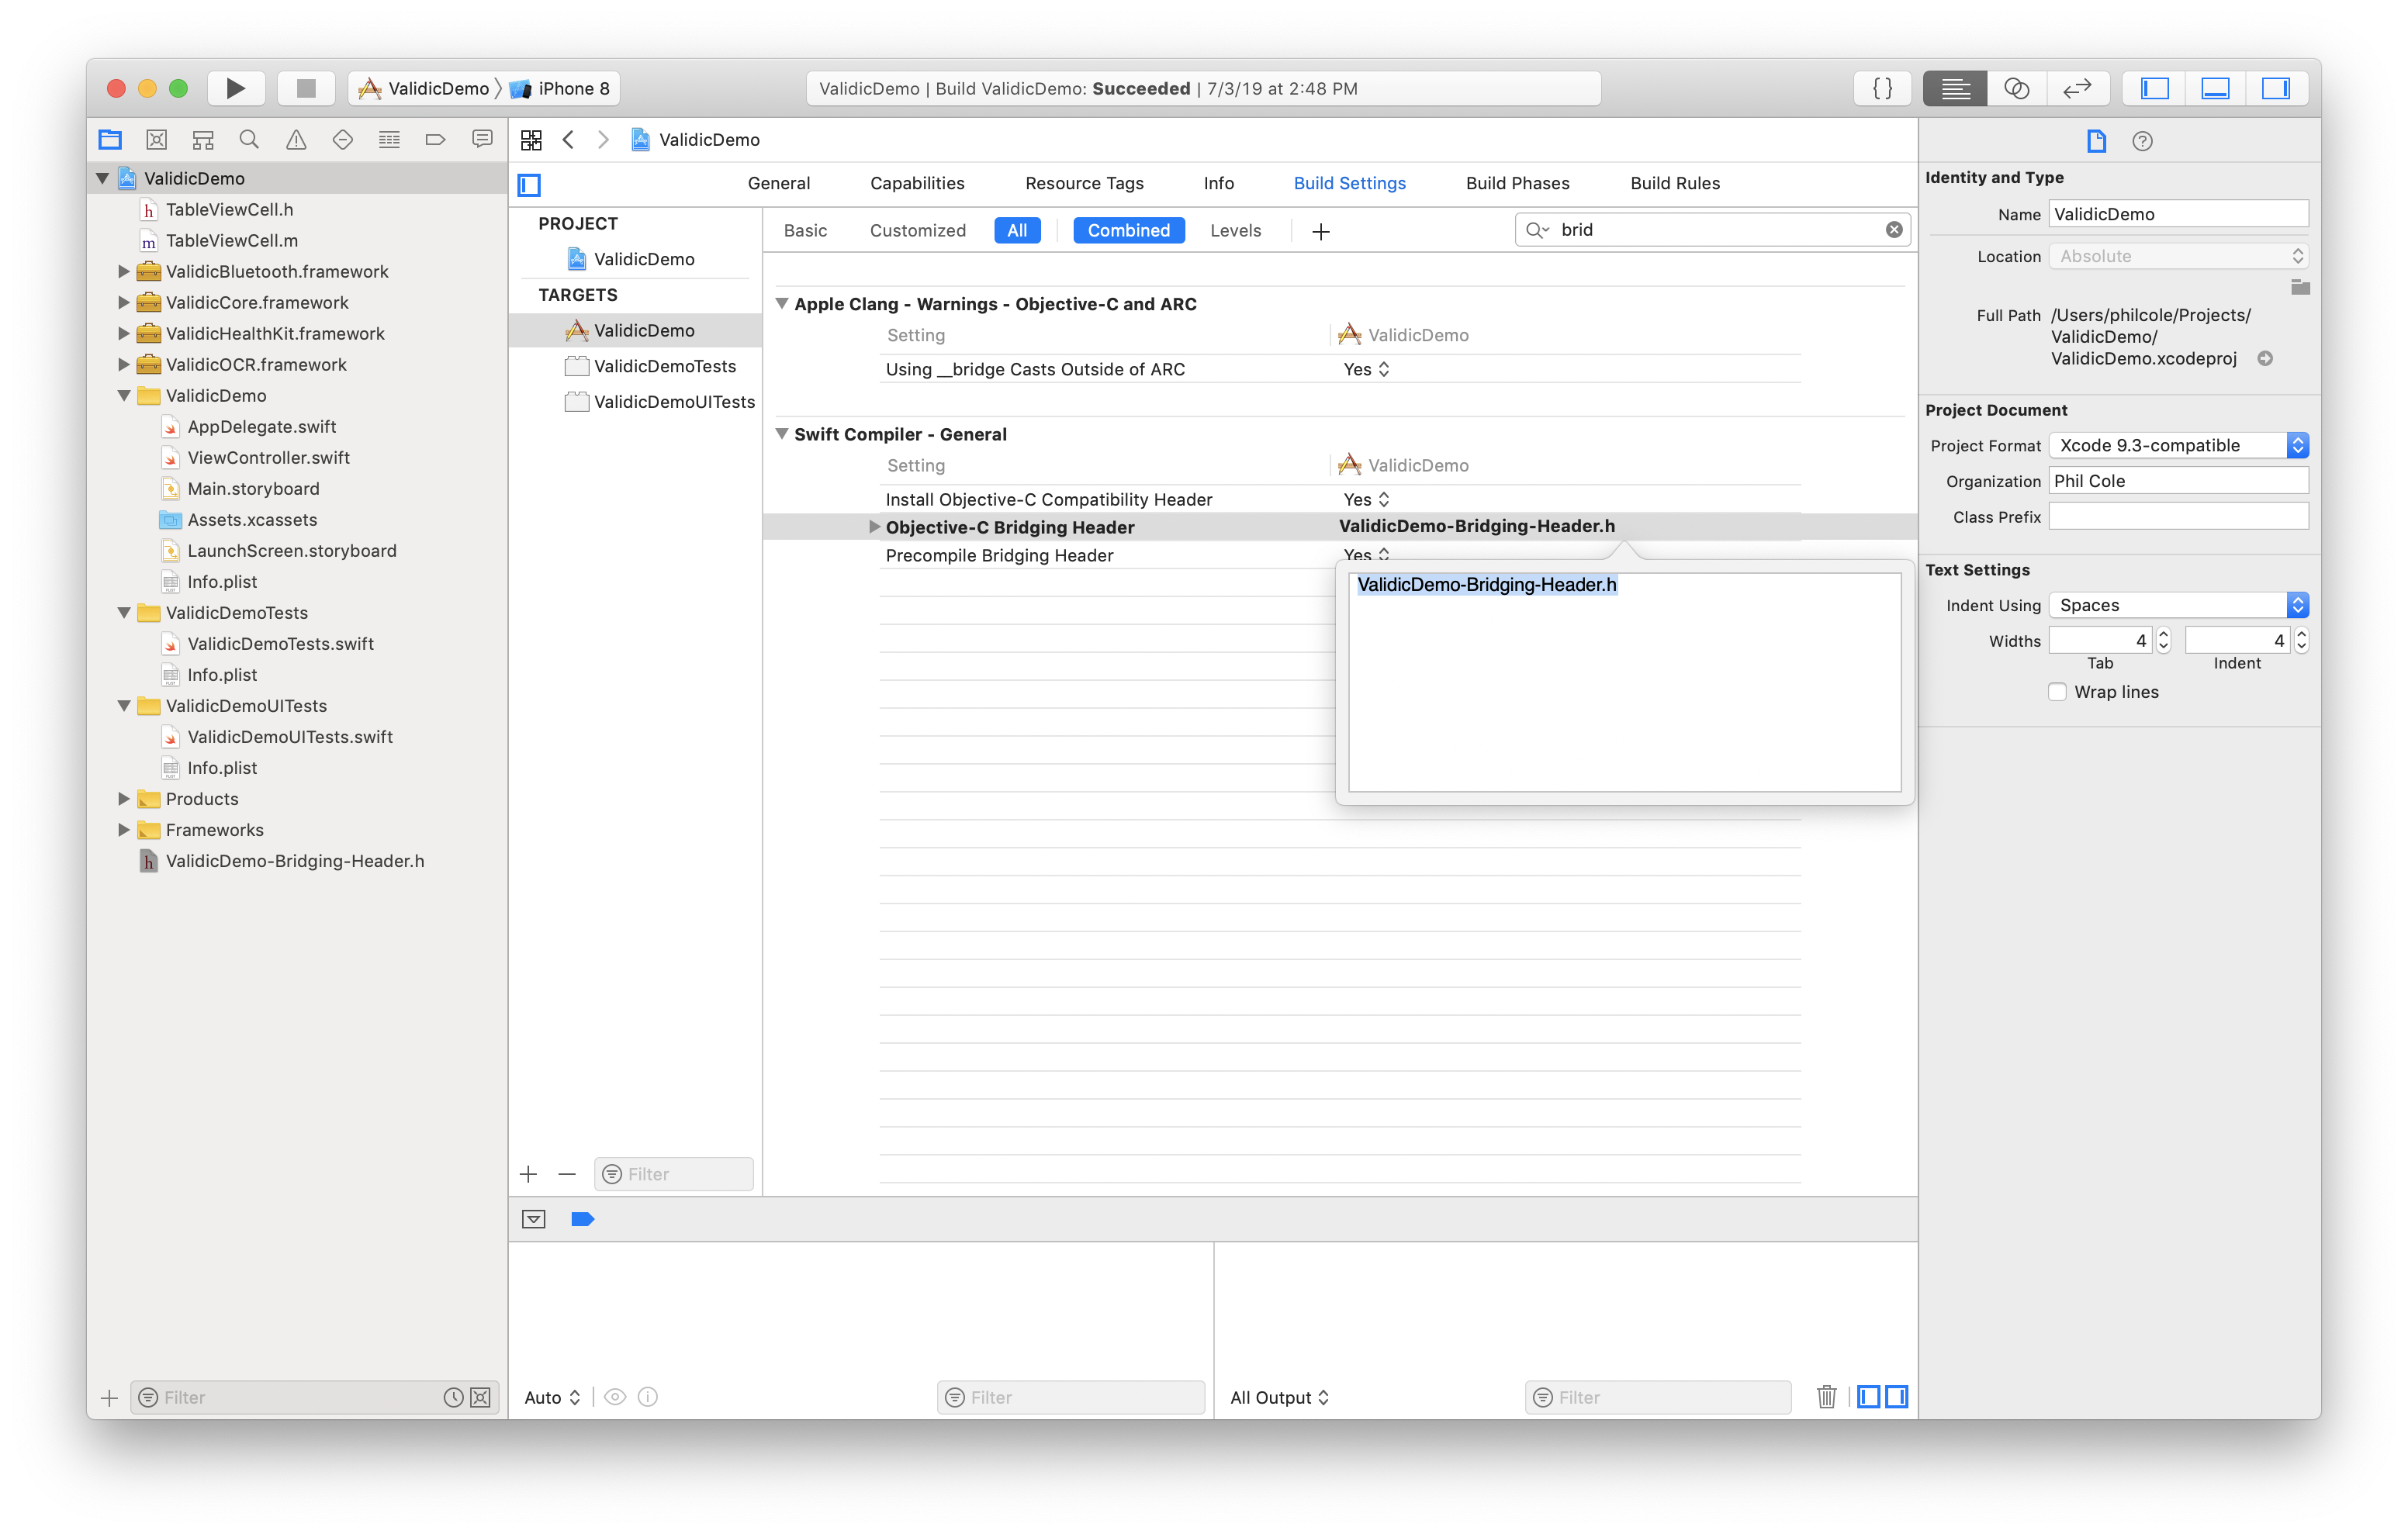
Then go to the build settings of your target and search for the Swift Compiler section and double click on the Objective-C Bridging Header field. In the dialog box that appears enter the name of the bridging header file ProjectName-Bridging-Header.h.
Test Installation
At this point installation of the frameworks is finished, let's do a test to make sure the project can find and compile the frameworks. Open the projects AppDelegate.swift file. At the top of the file add the following
import ValidicCore
Now add a print statement in the application:didFinishLaunchingWithOptions function
func application(_ application: UIApplication, didFinishLaunchingWithOptions launchOptions: [UIApplication.LaunchOptionsKey: Any]?) -> Bool {
        print(VLDSession.libraryVersion())
        return true
    }
In the console, you should see the library version printed out
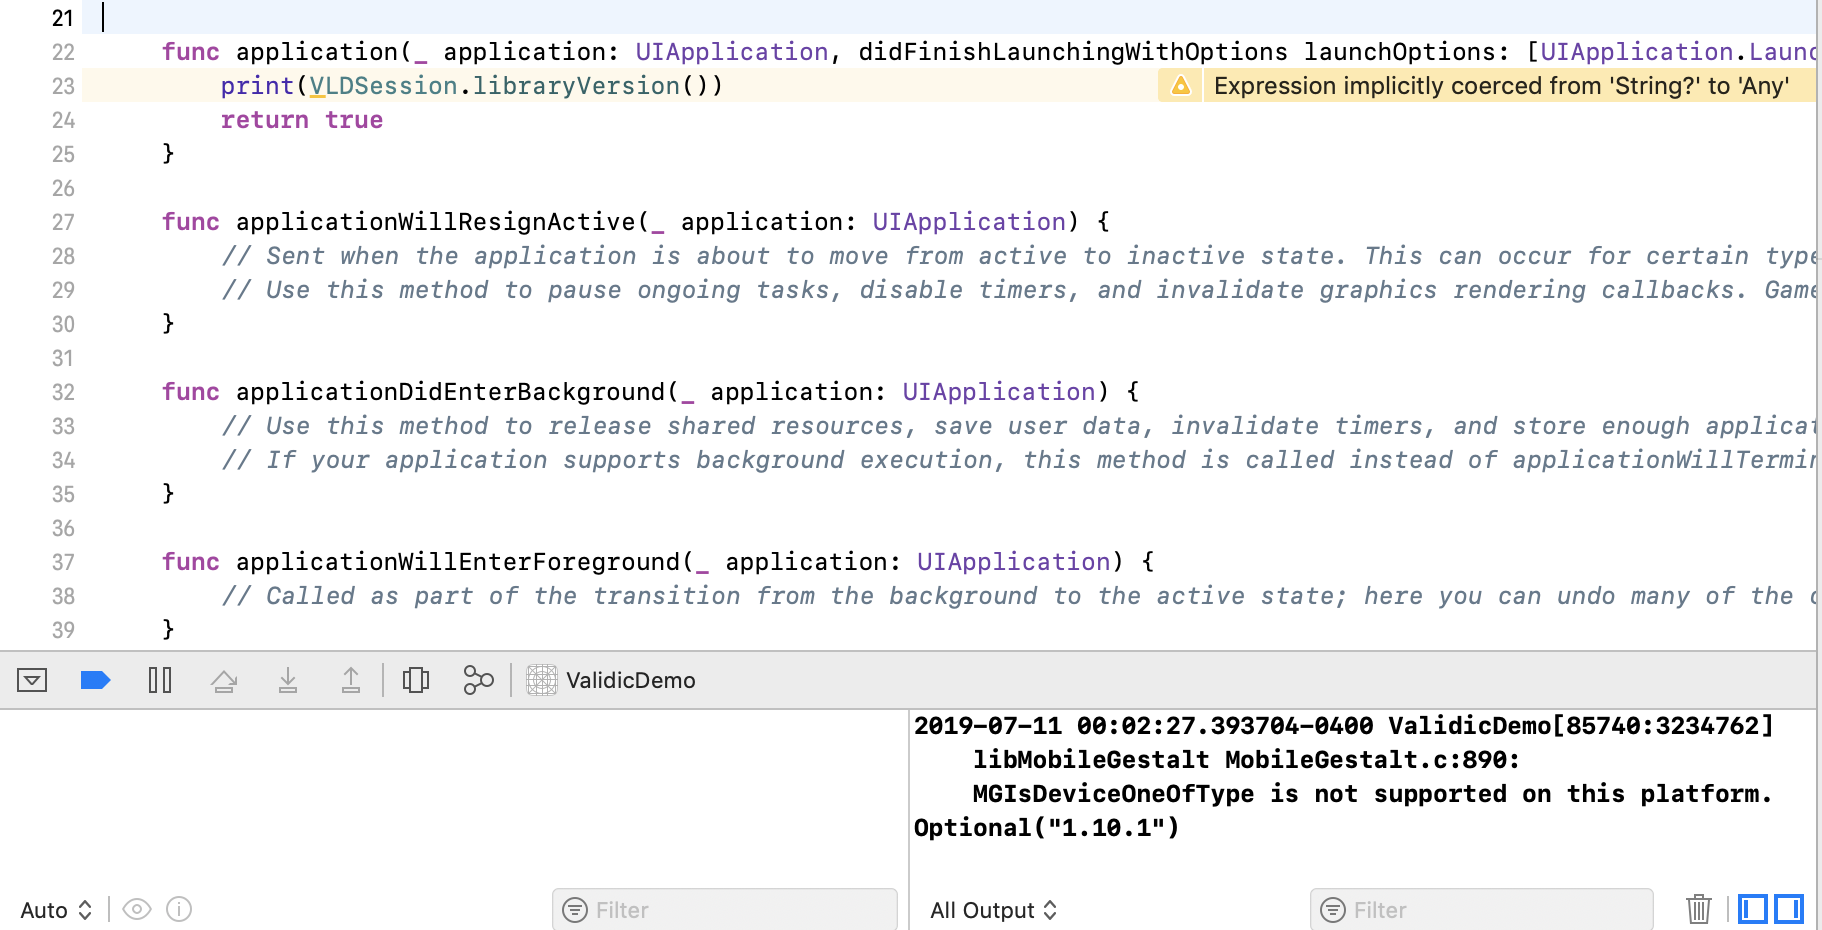
Xcode
Xcode 12.3
If you receive build errors like the following and are using Xcode 12.3+, be aware that validated workspaces are not currently supported.
... Building for iOS, but the linked and embedded framework 'Validic[...].framework' was built for iOS + iOS Simulator.
"Validate Workspace" and must be explicitly set to NO.
Due to a bug in Xcode, it must be toggled to YES, and then to NO in order to take effect for your project.

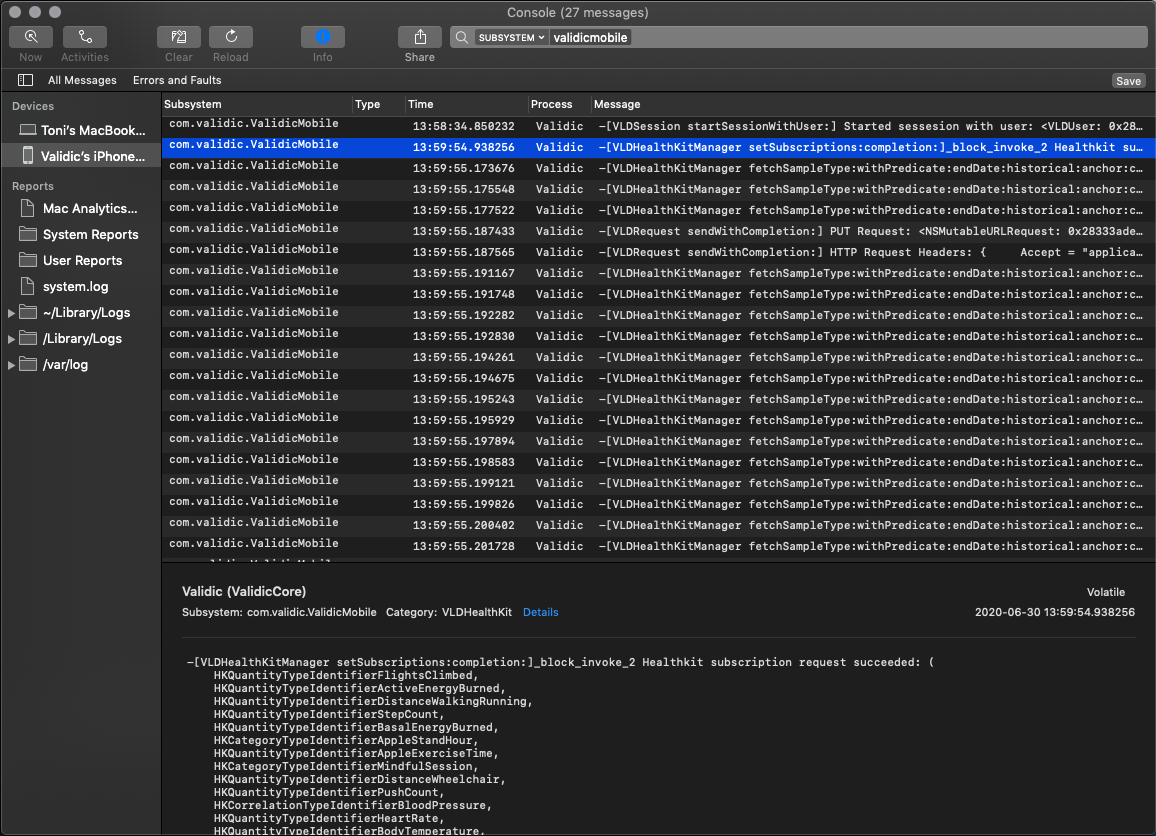
Logging
The Core and Healthkit frameworks include logging which can be enabled in debug or production app builds to get further insight into the following key activities:
- Session start - when Validic user session is initialized
- Subscription requests for Healthkit - when user initializes Healthkit sharing
- Healthkit record creation - when records are submitted to the Validic server
To enable logging, use VLDLogging:
    [[VLDLogging sharedInstance] setIsEnabled:YES];
    [[VLDLogging sharedInstance] setLog: VLDLogBluetooth | VLDLogCore | VLDLogOCR | VLDLogHealthKit];
    [[VLDLogging sharedInstance] setLogger:^(NSString *sdkTag, NSString *message) {
    // do something with log message originating from sdkTag
    }];
To retrieve the logs, you can:
- Implement a custom log handler using
SetLogger - Connect the iPhone to a computer running XCode and view the Console logs while running your app
- Use Sysdiagnose to retrieve the
system_logs.logarchivefile (helpful video)
To filter the logs down, try searching for VLDSession for session initialization, VLDHealthkit for subscription setting, and VLDCore for submissions to server.
Core
The Core framework provides convenient methods to the Validic API for uploading VLDRecord objects to Validic’s servers. It handles creating proper URLs, constructing the request object and parsing the server response. When not using [VLDSession submitRecord:] to upload data, it is recommended to use VLDAPIClient.
Requirements
The Validic Mobile library supports iOS 16 and above and requires Xcode version 14 or greater to compile.
Manage a Session
VLDSession stores a user, their current HealthKit subscriptions and all pending record uploads. This data is persisted between app launches but is deleted if endSession is called.
VLDSession is a singleton object and must be accessed by its sharedInstance method. The different frameworks of the Validic Mobile library rely on a valid user existing in the current VLDSession singleton object.
Start a session
To start a VLDSession you will need a VLDUser object. A Validic user can be provisioned using the Validic API, documentation is available for both Legacy API (V1) and Inform API (V2) Inform APIs. The credentials needed are a Validic user ID, an organization ID and a user access token. The user access token value you provide to the SDK is the "user access token" value if you use the Legacy (V1) API. The user access token value you provide to the SDK is the "mobile token" value if you use the Inform (V2) API.
let user = VLDUser(validicUserID:"user_id", organizationID:"organization_id", accessToken:"access_token")
The user object is then passed to the startSessionWithUser: method.
VLDSession.sharedInstance().start(with: user)
Note: As of Validic iOS SDK version 1.14.0, it is required to use valid Validic user credentials. The validicUserID, organizationID, and accessToken properties will be sent to the server for validation at the start of any user session. Sessions started with invalid or unknown user credentials (i.e. any credentials not provisioned by the Validic API) will be ended automatically.
Default User
The behavior described in this section is not commonly needed and can be skipped
The recommended SDK implementation is to always provision users on the Validic server then initialize the SDK with valid session credentials for the user. Therefore, use of the default user is not common and its use should be limited to strictly offline instances, where you are unable to retrieve valid session credentials and you need to perform a foreground operation (Bluetooth pair, Bluetooth foreground read, or VitalSnap read).
You must initialize the SDK with a valid user session in order for the following functions to work: Apple Health, Google Fit, and Samsung Health reads and passive Bluetooth reads.
During the transition period to validated users, Validic is providing a "default user" available for those who currently use an invalid user to capture foreground Bluetooth readings without submitting them to the server. This behavior is unsupported and will be deprecated and later removed in a future version of the SDK.
The default user is restricted to foreground Bluetooth reads and VitalSnap reads. All other attempted SDK actions will log a warning but not complete.
VLDSession.sharedInstance().start(with: VLDUser.defaultUser())
Session End Notification
When a VLDSession is ended, it will post an NSNotification. To listen for this notification add an observer to NSNotificationCenter with the constant kVLDSessionEndedNotification.
NotificationCenter.default.addObserver(self, selector: #selector(sessionDidEnd(_:)), name: NSNotification.Name.vldSessionEnded, object: nil)
When the notification is posted, the userInfo property of the notification will contain validicUserID, organizationID, and records properties.
@objc func sessionDidEnd(_ notification: Notification) {
    guard let sessionInfo = notification.userInfo as? [String:Any] else {
        return
    }
    let userID = sessionInfo["validicUserID"] as? String ?? ""
    let organizationID = sessionInfo["organizationID"] as? String ?? ""
    let unsyncedRecords = sessionInfo["records"] as? Array<VLDRecord> ?? []
    NSLog("Session ended for user %@ of organization %@, with %i unsynced records.", userID, organizationID, unsyncedRecords.count)
}
Best Practices
Check for an existing user in VLDSession before performing core logic related to your app.
guard let _ = VLDSession.sharedInstance().user else {
    showLoginScreen()
    return
}
Starting a session will delete the current session if it exists, clearing the cache user and any pending records that haven’t been uploaded.
Record types
The Validic Mobile library supports the following record types:
VLDBiometrics- comprised of a user’s biometric health data such as blood pressure, body temperature, SpO2, cholesterol, heart rate, and blood and hormone levels.VLDDiabetes- comprised of a user’s blood glucose and hormone levels related to diabetes treatment and management.VLDFitness- comprised of a user’s activities that are undertaken with the express purpose of exercising. These activities have a defined duration (time, distance, elevation, etc.)VLDNutrition- comprised of a user’s activities related to calorie intake and consumption and nutritional information (such as fat, protein, carbohydrates, sodium, etc.)VLDRoutine- comprised of a user’s activities that occur regularly throughout the day, without the specific goal of exercise, for example calories burned and consumed, steps taken, stairs climbed. These activities are aggregate throughout the day. Also includes Apple Exercise Minutes and Mindful Minutes.VLDSleep- comprised of a user’s measurements related to the length of time spent in various sleep cycles, as well as number of times woken during the night.VLDWeight- comprised of a user’s weight and body mass.
Record Identifiers
The Validic Mobile SDK uses log_id (for the Inform/V2 API) or activity_id (for the Legacy/V1 API) as the unique identifier for a given record. These IDs are created by the mobile SDK before submission to the server.
The Validic server also assigns an id (for the Inform/V2 API) or _id (for the Legacy/V1 API) for each unique record. It is recommended to use the server-side id / _id to identify and/or de-duplicate records post-submission.
Record Submission Notifications
When VLDSession uploads a record it will send an NSNotification. To listen for this notification add an observer to the NSNotificationCenter with the constant kVLDRecordSubmittedNotification.
NotificationCenter.default.addObserver(self, selector: #selector(recordDidUpload(_:)), name: NSNotification.Name.vldRecordSubmitted, object: nil)
When the notification is posted the object property of the notification will contain the VLDRecord object uploaded.
@objc func recordDidUpload(_ notification: Notification) {
    guard let record = notification.object as? VLDRecord else {
        return
    }
}
When VLDSession uploads an image it will send an NSNotification. To listen for this notification Add an observer to NSNotificationCenter with the constant kVLDRecordImageSubmittedNotification.
NotificationCenter.default.addObserver(self, selector: #selector(imageDidUpload(_:)), name: NSNotification.Name.vldRecordImageSubmitted, object: nil)
The object property of the notification will contain a VLDMedia object containing an ID for the image, and its URL.
@objc func imageDidUpload(_ notification: Notification) {
    guard let record = notification.object as? VLDMedia else { return }
    print(record.mediaID ?? "")
    print(record.mediaURL ?? "")
}
If a 400 error is returned from the server, the record will be discarded and an NSNotification will be posted. To listen for this notification add an observer to the NSNotificationCenter with the constant kVLDRecordSubmissionFailedNotification.
NotificationCenter.default.addObserver(self, selector: #selector(recordSubmissionDidFail(_:)), name: NSNotification.Name.vldRecordSubmissionFailed, object: nil)
The object property of the notification will contain the invalid VLDRecord object. The userInfo dictionary for this notification will contain one key, error with the NSError object for the failed upload.
@objc func recordSubmissionDidFail(_ notification: Notification) {
    guard let userInfo = notification.userInfo as? [String: Any],
        let error = userInfo["error"] as? NSError,
        let record = notification.object as? VLDRecord else {
            return
    }
    print("Record submission failed with error: \(error)")
    print("Record: \(record)")
}
If VLDSession attempts to upload the image associated with a record and the upload fails, an NSNotification, kVLDRecordImageSubmissionFailedNotification will be posted.
NotificationCenter.default.addObserver(self, selector: #selector(imageSubmissionDidFail(_:)), name: NSNotification.Name.vldRecordImageSubmissionFailed, object: nil)

@objc func imageSubmissionDidFail(_ notification: Notification) {
    guard let userInfo = notification.userInfo as? [String: Any],
        let error = userInfo["error"] as? NSError,
        let media = notification.object as? VLDMedia else {
            return
    }
    print("Record submission failed with error: \(error)")
    print("Media: \(media)")
}
Bluetooth
Overview
The Validic Mobile SDK supports Bluetooth Low Energy devices via three integration methods, as follows:
| Bluetooth framework - custom | Bluetooth framework - generic | One Touch framework |
|---|---|---|
| A custom integration via the Bluetooth framework is most the common integration method. These devices are assigned unique peripheralIDs and use custom Bluetooth Profiles. | A generic integration via the Bluetooth framework is available for some common Bluetooth Low Energy device types. The generic peripheralIDs work for devices that have been identified on the Bluetooth.org site as using the Bluetooth standard Profiles for glucose meters, pulse oximeters, blood pressure monitors, health thermometers, or weight scales. | The One Touch framework is a wrapper used alongside LifeScan's Mobile Connectivity Kit. |
Readings from custom or generic Bluetooth devices supported in the Bluetooth framework can be captured and uploaded to Validic with VLDBluetoothPeripheralController. A list of supported devices can be obtained calling the static function +supportedPeripherals on VLDBluetoothPeripheral. You must implement the VLDBluetoothPeripheralControllerDelegate protocol to receive callbacks so that the user may be prompted to take the measurement at the right time, display the measurement value, or get notified of any errors that occurred.
Please refer to the LifeScan section for details on how to use the One Touch framework.
Setup
Add NSBluetoothAlwaysUsageDescription to your app's Information Property List file.
If viewing the raw source add the NSBluetoothAlwaysUsageDescription key as displayed below.
<key>NSBluetoothAlwaysUsageDescription</key>
<string>Get Bluetooth readings</string>
Peripherals
VLDBluetoothPeripheral represents Bluetooth peripheral models that can be discovered or read from by VLDBluetoothPeripheralController.
A peripheral object contains various information to be displayed to the user:
name- Name of the peripheral comprised of the manufacturer name and model number.pairingInstructions- Text telling the user how to pair the peripheral, if the peripheral requires pairing.instructions- Text telling the user how to initialize the reading process with the peripheral.readingInstructions- Text telling the user what to do during the reading process.imageURL- URL for an image of the peripheral.
Supported Peripherals
To retrieve a list of peripherals that are supported in the Bluetooth framework call:
guard let supportedPeripherals = VLDBluetoothPeripheral.supportedPeripherals() as? [VLDBluetoothPeripheral] else { return }

for peripheral in supportedPeripherals {
    print("Peripheral: \(peripheral.name())")
}
Other methods are available on VLDBluetoothPeripheral to allow retrieval of a specific peripheral, or to retrieve a list of peripherals of a specific peripheral type. See the VLDBluetoothPeripheral documentation for additional information.
Generic Peripherals
You can communicate with glucose meters that fully support the Bluetooth generic Glucose Profile using peripheralID = 1000.
You can communicate with pulse oximeters that fully support the Bluetooth generic Pulse Oximeter Profile using peripheralID = 2000.
You can communicate with blood pressure monitors that fully support the Bluetooth generic Blood Pressure Monitor Profile using peripheralID = 3000.
You can communicate with thermometers that fully support the Bluetooth generic Health Thermometers Profile using peripheralID = 4000.
You can communicate with weight scales that fully support the Bluetooth generic Weight Scales Profile using peripheralID = 5000.
Unlike custom-supported peripherals, these generic peripherals have generic object information in the BluetoothPeripheral object. The intended implementation is you either filter these peripherals from your view, if you do not want to display them to your end users, or you substitute in your own device name, image, and instructions within your app so that end users see device information that's applicable to the specific device(s) you wish to support.
Filtering
To get a subset of devices you can use the built in filter method on Arrays in Swift. Check out the Supported Peripherals list to find the ID of the devices you want to display. For example, if you only want to display the Pyle Health Therometer you would:
guard let supportedPeripherals = VLDBluetoothPeripheral.supportedPeripherals() as? [VLDBluetoothPeripheral]
let devices = peripherals.filter { $0.peripheralID == 1 }
Pair
Certain peripherals require pairing with the mobile device before a reading can be taken. You can check the requiresPairing property on the VLDBluetoothPeripheral object to know if it must be paired.
To pair a peripheral with the mobile device, call the pairPeripheral: method on VLDBluetoothPeripheralController.
let peripheral: VLDBluetoothPeripheral
let controller = VLDBluetoothPeripheralController()
controller.delegate = self

controller.pairPeripheral(peripheral)
To know if a peripheral was successfully paired you will need to implement the pairing methods of the VLDBluetoothPeripheralControllerDelegate protocol.
func bluetoothPeripheralController(_ controller: VLDBluetoothPeripheralController!, didPairPeripheral peripheral: VLDBluetoothPeripheral!) {
    // Peripheral paired successfully
}

func bluetoothPeripheralController(_ controller: VLDBluetoothPeripheralController!, didNotPairPeripheral peripheral: VLDBluetoothPeripheral!, error: Error!) {
    // Peripheral did not pair
}
Read
Once you are ready to read from a peripheral, the process is fairly similar to the pairing process. You should initially show the peripheral’s instructions and then show the reading instructions once bluetoothPeripheralController:isReadyToReadFromPeripheral: is called.
let peripheral: VLDBluetoothPeripheral = // A peripheral from the supportedPeripherals list
let controller = VLDBluetoothPeripheralController()
controller.delegate = self

controller.read(from: peripheral)
You must also implement the reading methods of the VLDBluetoothPeripheralControllerDelegate protocol.
func bluetoothPeripheralController(_ controller: VLDBluetoothPeripheralController!, isReadyToReadFrom peripheral: VLDBluetoothPeripheral!) {
    // Time to present the readingInstructions to the user
}

func bluetoothPeripheralController(_ controller: VLDBluetoothPeripheralController!, shouldSubmitReadings records: [VLDRecord]!, from peripheral: VLDBluetoothPeripheral!) -> Bool {
    // To have the reading automatically added to the session and uploaded
    // return YES from this method. To first have the reading validated by the user
    // you can return NO from this method. Once the user has validated the reading
    // you must manually submit the record by calling VLDSession.sharedInstance().submitRecord(record)
    return true
}

func bluetoothPeripheralController(_ controller: VLDBluetoothPeripheralController!, didCancelReadingFor peripheral: VLDBluetoothPeripheral!) {
    // Reading was cancelled
}

func bluetoothPeripheralController(_ controller: VLDBluetoothPeripheralController!, readingFailedFor peripheral: VLDBluetoothPeripheral!, error: Error!) {
    // Reading failed
}
Passive Read
Overview
The ValidicBluetooth library supports passively reading from a given set of Bluetooth peripherals. Passive Bluetooth reading is a long lived capability. Once enabled, the library will listen for and read from the specified peripherals. Reading will automatically occur once the peripheral is discovered regardless of app state. This includes if the application is currently in the foreground, in the background, or has been terminated due to memory pressure. Apps using this feature must have been started by the user at least once since the iOS device has booted otherwise the feature will not be active even if enabled.
Setup
Passive Bluetooth reading relies upon iOS Bluetooth state restoration and background processing support. Apps using passive reading need to set Bluetooth as a required background mode in the Info.plist. In Xcode, in the Info.plist add a new key, Required background modes, add an item with value App communicates using CoreBluetooth.

If editing the XML source file, add Bluetooth-central background mode as follows:
    <key>UIBackgroundModes</key>
    <array>
        <string>Bluetooth-central</string>
    </array>
Passive Readings
VLDBluetoothPassiveManager is a singleton which coordinates the passive reading process. Passive reading is enabled by passing it an array of peripheral IDs:
VLDBluetoothPassiveManager.sharedInstance().peripheralIDs = [1, 2]
Or by passing an array of peripherals:
if let peripheral = VLDBluetoothPeripheral(forID: 1) {
    VLDBluetoothPassiveManager.sharedInstance().setPeripherals([peripheral])
}
To disable passive reading, set the peripheralIDs property to an empty array or nil.
VLDBluetoothPassiveManager.sharedInstance().peripheralIDs = nil
To support state restoration, a method on the passive manager must be called on app launch. This should be done in the application:didFinishLaunchingWithOptions: method of the AppDelegate as follows:
    func application(_ application: UIApplication, didFinishLaunchingWithOptions launchOptions: [UIApplicationLaunchOptionsKey : Any]? = nil) -> Bool {
        VLDBluetoothPassiveManager.sharedInstance().restoreState()
        return true
    }
State restoration will automatically start the app in the background when a requested peripheral is discovered. Within application:didFinishLaunchingWithOptions:, apps can determine if they were launched in the background and avoid expensive operations.
Passive Readings Notifications
Passive readings are automatically sent to the Validic server. Session notifications are sent on upload success or failure. Passive Bluetooth specific notifications are sent when a device is discovered and becomes ready to read. Notifications are also sent for reading success and failure. These notifications specify the associated peripheral ID in the userInfo dictionary with a key, peripheralID.
- kVLDBluetoothPassiveDidReadNotification is sent when records are read. The notification object is an array of
VLDRecordread from the peripheral. - kVLDBluetoothPassiveDidFailNotification is sent when failing to read from a discovered peripheral.
- kVLDBluetoothPassiveIsReadyToReadNotification is sent when the peripheral becomes ready to read. This notification is only sent out for devices that are discoverable before a measurement is taken. It is important to handle this notification in an app and provide feedback to the user that the device has been discovered and is ready to take a measurement. Since Passive Bluetooth reading is usually performed in the background, a standard UI is not available. A local notification can be sent with sound to provide feedback to the user that the app is ready to read from the peripheral. If the user doesn’t hear the sound, it indicates that the device has not been discovered.
The following code fragment registers an observer for the kVLDBluetoothPassiveIsReadyToReadNotification notification and sends a local notification including the name of the peripheral. A similar process could be done for the kVLDBluetoothPassiveDidReadNotification to confirm to the user that a reading was successfully taken.
NotificationCenter.default.addObserver(forName: NSNotification.Name.vldBluetoothPassiveIsReadyToRead, object: nil, queue: nil) { (notification) in
    if UIApplication.shared.applicationState == .background {
        if let peripheralID = notification.userInfo?["peripheralID"] as? UInt,
            let peripheralName = VLDBluetoothPeripheral.init(forID: peripheralID)?.name()
        {
            let localNotification = UILocalNotification()
            localNotification.alertBody = "Ready to read \(peripheralName)"
            UIApplication.shared.presentLocalNotificationNow(localNotification)
        }
    }
}
Considerations
Agamatrix
The Agamatrix Jazz Wireless 2 glucose meter, supported via a custom Bluetooth integration (peripheralID = 32), requires an authentication key, which is provided by Agamatrix, in order to communicate with the meter. To configure your Agamatrix authentication key for use with the Agamatrix meter in the Validic Mobile SDK:
- Create a file named
agamatrix-authkey.json - File contents should be your Agamatrix key without the hex prefix notation
0x. For example, if your key is0x011234567890987654321then your file contains{"key": "011234567890987654321"}. - Add the
agamatrix-authkey.jsonfile to the root of your mobile project.
CVS Health
The CVS Health Advanced Bluetooth Glucose Meter, supported via a custom Bluetooth integration (peripheralID = 33), requires an authentication key, which is provided by Agamatrix, in order to communicate with the meter. To configure your Agamatrix authentication key for use with the CVS Health meter in the Validic Mobile SDK:
- Create a file named
cvshealth-authkey.json - File contents should be your Agamatrix key without the hex prefix notation
0x. For example, if your key is0x055234567890987654987then your file contains{"key": "055234567890987654987"}. - Add the
cvshealth-authkey.jsonfile to the root of your mobile project.
The CVS Health Digital Glass Body Analysis Scale is supported in an alpha state in the Validic Mobile SDKs. Body weight is the only metric that can be retrieved from the scale and a new user profile will be created on the scale during pairing. Users cannot pair to an existing user profile and historical readings (readings captured prior to pairing) will not be synced.
Roche CoaguChek INR Meters
Approval Required
Interacting with Roche CoaguChek devices requires pre-approval from Roche. Please reach out to Validic Support at [email protected] if you are interested in integrating with Roche CoaguChek devices.
Overview
Interaction with Roche CoaguChek INR meters, supported via a custom Bluetooth integration (peripheralID = 51), requires a Validic License file, provided by Validic Support. The license file (named validic.license) must be included in the root of the main app bundle; to do so, add it to the Xcode project and make sure validic.license is listed in the "Copy Bundle Resources" section of the app target's "Build Phases".
Roche CoaguChek INR meters have an uncommon reading workflow, which requires that the end user provide their meter's unique encryption key. That encryption key is required to decrypt the reading values captured from the user's meter. Without a valid encryption key, foreground and passive reads with the INR meter will fail. Because this workflow is specific to the Roche INR meter, any Validic clients implementing the INR meter Bluetooth integration must build a user experience (modal or screen) to capture the meter's encryption key from the user. This key must then be passed by the client to the Validic SDK where it will be stored and used to decrypt readings. Note: the key is a long string of hexadecimal characters, so it is recommended to implement a QR code reading to capture the code displayed on the meter.
One way to do this would be to request it during the pairing process:
- Initiate pairing with peripheral ID 51
- Upon successful pair, the
VLDBluetoothPeripheralDelegatecallback (bluetoothPeripheralController:didPairPeripheral:metadata:) will be fired. Store themetadataobject'speripheralUUIDstring to a variable - it will be used to store the encryption key into the Validic SDK. - Prompt the user for the encryption key, found in the device's menu at "Other" > "About" (possibly by using a QR code reader).
- Store the encryption key into the SDK. To do this, pass the user's encryption key, the constant
kVLDBluetoothPeripheralDataKeyEncryptionKey, and the peripheral's UUID (frommetadata.peripheralUUIDin the pairing success delegate callback) to the CoaguChekVLDPeripheral'sstoreData:forKey:ofPeripheralUUID:method.
Example code:
// This example requests the encryption key from inside the pairing success callback for simplicity. Note that the only requirement is that the `metadata.peripheralUUID` value is captured from this callback so it can be used in the `storeData:forKey:ofPeripheralUUID:` call.
// This example uses a UIAlertController text field to collect the encryption key from the user. It is recommended to use a QR code reader to reduce the likelihood of errors.
- (void)bluetoothPeripheralController:(VLDBluetoothPeripheralController *)controller didPairPeripheral:(VLDBluetoothPeripheral *)peripheral metadata:(VLDBluetoothOperationMetadata *)metadata {
    if (peripheral.peripheralID == 51) {
        // Peripheral is CoaguChek, ask for encryption key
        UIAlertController *coaguChekEncryptionKeyAlertController = [UIAlertController alertControllerWithTitle:@"Enter Encryption Key" message:@"Please enter the CoaguChek's encryption key." preferredStyle:UIAlertControllerStyleAlert];
        [coaguChekEncryptionKeyAlertController addTextFieldWithConfigurationHandler:^(UITextField * _Nonnull textField) {
            textField.placeholder = @"Encryption Key";
        }];
        [coaguChekEncryptionKeyAlertController addAction:[UIAlertAction actionWithTitle:@"OK" style:UIAlertActionStyleDefault handler:^(UIAlertAction * _Nonnull action) {
            NSString *encryptionKey = [[coaguChekEncryptionKeyAlertController textFields][0] text];
            // Note: it is recommended to perform validation on the length and contents of the provided encryption key (if not scanned via QR code) to reduce the possibility of uncaught input error. The entered encryption key should be a 32-character hexadecimal string.

            // Store the encryption key into the Validic SDK
            [peripheral storeData:encryptionKey forKey:kVLDBluetoothPeripheralDataKeyEncryptionKey ofPeripheralUUID:metadata.peripheralUUID];
        }]];
        [coaguChekEncryptionKeyAlertController addAction:[UIAlertAction actionWithTitle:@"Cancel" style:UIAlertActionStyleCancel handler:^(UIAlertAction * _Nonnull action) {
            NSLog(@"Encryption key entry canceled.");
        }]];
        [self presentViewController:coaguChekEncryptionKeyAlertController animated:YES completion:nil];
    }
}
Passive Read
There are situations where passive Bluetooth reading is stopped and requires the app to be relaunched. These situations include:
- When the user explicitly kills the app by swiping up on the app switcher view, the app will not be restarted by iOS when a peripheral is discovered.
- If the iOS device is rebooted, state restoration is no longer in effect and iOS will not automatically restart the app when a peripheral is discovered. The app needs to be run at least once after reboot. When the app is launched the passive manager remembers what peripherals if any where being passively read and restarts the capability.
Passive Bluetooth reading has some additional considerations due to the behavior of the iOS Bluetooth stack and background support.
- Interactive, ie non-passive, Bluetooth operations will suspend passive Bluetooth processing until the interative operation completes.
- When scanning for peripherals in the background, iOS reduces the frequency and duration of time the phone listens for devices. This may cause some peripherals to not be discovered in the background. This varies by phone model and peripheral. Generally older phone models are more likely to miss discovery of a peripheral.
- Nonin pulse oximeters, ChoiceMMed pulse oximeter and scale are not usually detectable when in the background.
- The Pyle thermometer is sometimes not discovered on old phone when the app is in the background.
- iOS has additional heuristics to determine scanning frequency which may not be documented. If multiple apps on the phone are performing background scanning, scanning may become more infrequent.
- To prevent repeated attempted reads from a device for one actual reading, the passive manager waits after a successful read until the device stops broadcasting, then waits an additional few seconds before acknowledging the device again. If attempting multiple readings in quick succession, the second reading may not be read. Instead the user should wait until the device powers off and then wait an additional 15 seconds or longer before attempting another reading.
HealthKit
The Validic Mobile library provides a simple way to read and upload data from HealthKit to Validic. VLDHealthKitManager can subscribe to specific HealthKit sample types and automatically upload them to Validic in the background as new data is recorded.
Before you can use the HealthKit features of the library, be sure to import the HealthKit framework into your project and enable the Health entitlements for your app.
Note: Starting in Xcode 13 & iOS 15, your app needs a new entitlement added to the entitlements file. This new entitlement is called "HealthKit Observer Query Background Delivery" and should be set to "YES":

HealthKit Entitlements
If viewing the raw entitlements file, add the new key and value as displayed below:
<key>com.apple.developer.healthkit.background-delivery</key>
<true/>
Setup
- The HealthKit framework requires filling in the
Privacy - Health Share Usage DescriptionandPrivacy - Health Update Usage Descriptionkeys and values if edited in Xcode.

If viewing the raw source add the NSHealthShareUsageDescription and NSHealthUpdateUsageDescription keys as displayed below.
<key>NSHealthShareUsageDescription</key>
<string>Get Health data</string>
<key>NSHealthUpdateUsageDescription</key>
<string>Write Health data</string>
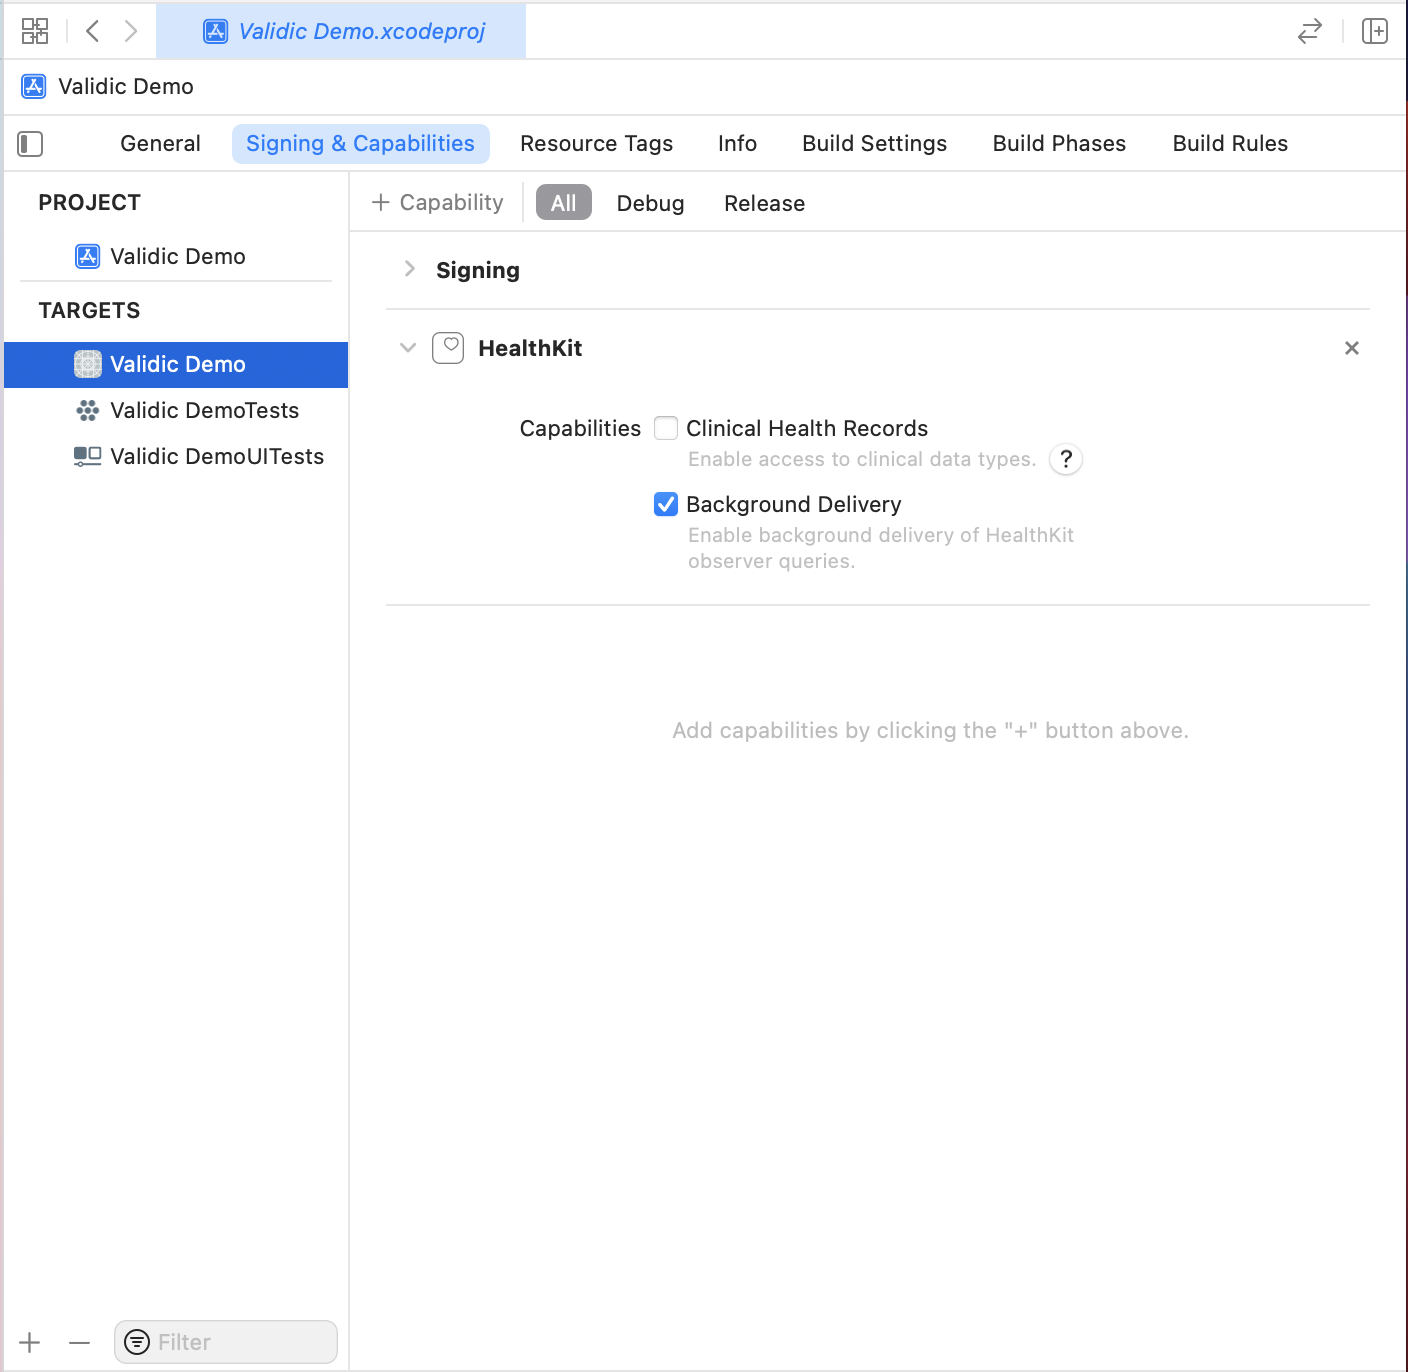
To use HealthKit in your project you must enable it from the "Signing & Capabilities" tab. Select your project target and then select the "Signing & Capabilities" tab. Click "+ Capability", scroll down until you find HealthKit, and double-click it to add HealthKit to the project. Make sure to check the box next to "Background Delivery" in the newly-added HealthKit section. Your project should look like the screenshot below.
In new Xcode projects the HealthKit framework will be linked automatically when the framework is imported by a project file. To confirm this navigate to the Build Settings tab of the project target and search for Link Frameworks. Under Under Clang - Language - Modules you’ll see Link Frameworks Automatically set to Yes.

Subscription sets
Useful sets of sample types are defined in an VLDHealthKitSubscriptionSet enum. Sample types for a subscription set can be retrieved using the sampleTypesForSubscriptionSet: static method of the VLDHealthKitSubscription class. The following subscription sets are available:
VLDHealthKitSubscriptionSetRoutine: Includes Flights Climbed, Active Energy Burned, Step Count, Basal Energy Burned, Apple Stand Hours, Apple Exercise Minutes, Mindful Minutes (from the Apple Watch), Idle Hour Count, and Stand Hour Count.VLDHealthKitSubscriptionSetDiabetes: Blood Glucose sample type.VLDHealthKitSubscriptionSetWeight: Includes Body Mass (weight), Height, Body Fat Percentage, Lean Body Mass, and Body Mass Index (BMI).VLDHealthKitSubscriptionSetFitness: Includes Workout, Average Heart Rate, Min Heart Rate, Max Heart Rate, Distance, Energy Burned, and Duration.VLDHealthKitSubscriptionSetSleep: Sleep Analysis sample type, this set tracks time in bed, time awake, and time asleep.VLDHealthKitSubscriptionSetBasicNutrition: Includes Calcium, Carbohydrates, Cholesterol, Fiber, Protein, Saturated Fat, Sodium, Total Fat, Energy Consumed, and Dietary Water.VLDHealthKitSubscriptionSetReproductiveHealth(legacy API only): Includes Sexual Activity, Cervical Mucus Quality, Intermenstrual Bleeding, Menstrual Flow, Ovulation Test Result, and BasalBodyTemperature.VLDHealthKitSubscriptionSetBiometrics: Includes Systolic Blood Pressure, Diastolic Blood Pressure, Heart Rate, Body Temperature, and SpO2 (oxygen saturation).
Subscribe to changes
Subscribing to HealthKit updates only needs to be done once for a user. The subscriptions will be persisted across app launches in the VLDSession object. A typical use of the HealthKit framework would be to create a UISwitch that adds the required subscriptions when turned on and removes them when turned off. Example:
func toggleHealthKit(_ sender: UISwitch) {
    if sender.isOn {
        var sampleTypes = VLDHealthKitSubscription.sampleTypes(for: VLDHealthKitSubscriptionSet.routine)
        sampleTypes?.append(contentsOf: VLDHealthKitSubscription.sampleTypes(for: VLDHealthKitSubscriptionSet.biometrics))
        sampleTypes?.append(contentsOf: VLDHealthKitSubscription.sampleTypes(for: VLDHealthKitSubscriptionSet.diabetes))
        sampleTypes?.append(contentsOf: VLDHealthKitSubscription.sampleTypes(for: VLDHealthKitSubscriptionSet.sleep))
        sampleTypes?.append(contentsOf: VLDHealthKitSubscription.sampleTypes(for: VLDHealthKitSubscriptionSet.basicNutrition))
        sampleTypes?.append(contentsOf: VLDHealthKitSubscription.sampleTypes(for: VLDHealthKitSubscriptionSet.fitness))
        sampleTypes?.append(contentsOf: VLDHealthKitSubscription.sampleTypes(for: VLDHealthKitSubscriptionSet.weight))

        VLDHealthKitManager.sharedInstance().setSubscriptions(sampleTypes, completion: nil)
    } else {
        VLDHealthKitManager.sharedInstance().setSubscriptions([], completion: nil)
    }
}
Retrieve data continuously
To properly enable the continuous delivery of data in the background or foreground, the subscription observers need to be recreated immediately when the app is launched from a suspend or terminated state. To do this, you need to call [VLDHealthKitManager observeCurrentSubscriptions] inside your application delegate’s application:didFinishLaunchingWithOptions: function. Example:
func application(_ application: UIApplication didFinishLaunchingWithOptions launchOptions: [UIApplicationLaunchOptionsKey : Any]? = nil) -> Bool {
    VLDHealthKitManager.sharedInstance().observeCurrentSubscriptions()
    return true
}
Note: Calling [[VLDSession] sharedInstance] endSession] in Objective-C or VLDSession.sharedInstance().end() in Swift will remove all HealthKit subscriptions and stop listening for new data.
Subscribe to Intraday steps
The Validic Mobile library supports retrieving more fine grain step data through VLDIntraday. If enabled via your SDK this will automatically be gathered when subscripting to VLDHealthKitSubscriptionSetRoutine. This is a premium feature and is not enabled by default, if you have access you can set processIntraday to YES to get intraday step data sent to Inform.
Fetch historical data
The Validic Mobile library provides the ability to query up to 180 days of historical data for a subset of data types provided by HealthKit by specifying one of more values of the VLDHealthKitHistoricalSet enum.
Two historical sets are available:
- VLDHealthKitHistoricalSetRoutine - Steps and similar daily summarized data
- VLDHealthKitHistoricalSetFitness - Workout data
- VLDHealthKitHistoricalSetIntraday - Intraday step data (Premium feature, with only 7 days of historical data)
To fetch historical HealthKit data, call the fetchHistoricalSets: method on VLDHealthKitManager and pass in the datasets you want to fetch, along with from and to parameters.
The from and to parameters should be DateComponents with the year, month, and day components defined. Data is always pulled in full-day increments, so any time data on the DateComponents (hour, minute, second, etc) will be ignored. Historical data cannot go back more than 179 days before the current day.
Example pulling 30 days of history:
let toDate = Calendar.current.startOfDay(for: Date())
let toDateComponents = Calendar.current.dateComponents([.year, .month, .day], from: toDate)
let fromDate = Calendar.current.date(byAdding: .day, value: -30, to: toDate, wrappingComponents: false)!
let fromDateComponents = Calendar.current.dateComponents([.year, .month, .day], from: fromDate)

VLDHealthKitManager.sharedInstance().fetchHistoricalSets([NSNumber(value:VLDHealthKitHistoricalSet.fitness.rawValue),
                                                          NSNumber(value:VLDHealthKitHistoricalSet.routine.rawValue)]),
                                                          from: fromDateComponents,
                                                          to: toDateComponents
                                                          { (results:[AnyHashable : Any]?, error:Error?) in
    // historical fetch complete
}
Doing this may display a permission dialog from HealthKit, so it's important to call this at an appropriate time in your app. It is recommended to explain to the user why you want this data before attempting to fetch it. This operation may take several seconds to complete so it would be advisable to display an activity indicator to the user until the completion block is called. When the fetch completes all the data will have been fetched locally and queued up for submission to the server. The amount of time needed to upload the records may vary based on the amount of history fetched and the user's internet speed. The queued records are uploaded automatically by the library based on connectivity, but it is possible for the user to suspend the app before all the records have been uploaded, the remaining records will be uploaded when the user resumes the app. This should be kept in mind when receiving records from the Validic server.
Considerations
Passive Reading Sync
There are situations where Apple Health passive reading is stopped and requires the app to be relaunched. These situations include:
- When the user explicitly kills the host app by swiping up on it from the mutitasking view.
- When the OS kills the app due to low memory, low battery, etc.
- When the device is rebooted.
The user must restart the host app to resume passive reading of Apple Health data.
VitalSnap (OCR)
Setup
- The OCR framework uses the camera, which requires the
Privacy - Camera Usage Descriptionkey and value to be set in the Xcode target's Info tab.

If editing the raw Info.plist file, add the NSCameraUsageDescription key as displayed below.
<key>NSCameraUsageDescription</key>
<string>Get VitalSnap readings</string>
Overview
The Validic mobile library OCR feature provides the capability to obtain readings from devices without requiring Bluetooth or HealthKit integration.
OCR Peripherals
VLDOCRPeripheral represents peripheral models that can be processed by OCR.
A peripheral object contains various properties which can be displayed to the user:
name- Name of the peripheral comprised of the manufacturer name and model number.imageURL- URL for an image of the peripheral.overlayImage- UIImage of the overlay used to position the peripheral within the camera preview.
To obtain a VLDOCRPeripheral, several class methods are provided to be able to retrieve one or more supported peripherals.
// Retreive a specific peripheral
VLDOCRPeripheral *peripheral = [VLDOCRPeripheral peripheralForID:1];
// or by type
NSArray *peripherals = [VLDOCRPeripheral peripheralsOfType: VLDPeripheralTypeGlucoseMeter];
// or retrieve a list of all supported peripherals
NSArray *peripherals = [VLDOCRPeripheral supportedPeripherals];

// Retreive a specific peripheral
let peripheral = VLDOCRPeripheral(forID: 1)
// or by type
let peripherals = VLDOCRPeripheral.peripherals(of: .glucoseMeter)
// or retrieve a list of all supported peripherals
let peripherals = VLDOCRPeripheral.supportedPeripherals()
OCR View controller
The VLDOCRViewController provides a simple interface to optically scan a peripheral and provide the resulting reading. This view controller presents a prepackaged view and is typically displayed modally. It presents a camera view with an overlay appropriate to the peripheral being scanned. Partial results are displayed in the view while recognition is in progress. When it converges on a value, the delegate method, ocrViewController:didCompleteReading:image:metadata: is called with the results. An example application, “OCR example”, is provided, written in Swift which illustrates this OCR API. It is contained within the “Example Apps/Swift OCR” directory in the library download.
The app must have permission to access the camera. Permission will be requested on first launch of the VLDOCRViewController. If the library is unable to access the camera, the delegate method,
ocrViewControllerWasDeniedCameraAuthorization: is called.
The info.plist must also include a Camera Usage Description.
The presented view provides a button to cancel OCR. If the user cancels, the delegate method, ocrViewControllerDidCancel: is called.
When any of the three delegate methods are invoked, the view controller should be dismissed.
The following example constructs a VLDOCRViewController for the designated peripheral and presents it.
if let controller = VLDOCRViewController(ocrPeripheralID: 3) {
   controller.delegate = self
   self.present(controller, animated: true, completion: nil)
}
Delegate callbacks dismiss the view controller and handle the returned record. The recognized value returned in the delegate call back should be displayed to the user so that they can verify the value and modify it if incorrect. The image that was recognized is also provided and can be displayed to the user to verify the value.
func ocrViewControllerDidCancel(_ viewController: VLDOCRViewController) {
  viewController.dismiss(animated: true, completion: nil);
}

func ocrViewControllerWasDeniedCameraAuthorization(_ viewController: VLDOCRViewController) {
    print("Unable to access camera")
    viewController.dismiss(animated: true, completion: nil);
}

func ocrViewController(_ viewController: VLDOCRViewController, didCompleteReading record: VLDRecord?, image: UIImage?, metadata: [AnyHashable : Any]?) {
    // Display the value and image, allow the user to correct
    viewController.dismiss(animated: true, completion: nil);
}
The record received from the OCR View Controller should be verified by the user and then submitted to the Validic server.
// After verification, queue the record and image to be uploaded to the server
VLDSession.sharedInstance().submitRecord(record, image: image)
Runtime unit selection
For any glucose meter in our lineup of supported meters, you can now specify mmol/l or mg/dL at runtime for a given reading. If no unit is provided, mg/dL is assumed.
For the Zewa 11110 thermometer, you can specify Celsius or Fahrenheit at runtime for a given reading. If no unit is provided, Fahrenheit is assumed.
An example using the VLDOCRViewController:
ocrViewController = VLDOCRViewController(ocrPeripheralID: 9, glucoseUnit: .MMOLL)
OCR - Custom view (optional)
If more control over the OCR view is needed, a custom view can be implemented to perform OCR using the [VLDOCRController](Classes/VLDOCRController.html) class. The simpler [VLDOCRViewController](Classes/VLDOCRViewController.html) is recommended unless customizing the view is required. An example application, “VitalSnap example”, is provided written in Swift which illustrates this OCR API. It is contained within the “Example apps/Swift VitalSnap” directory in the library download.
Process overview
An instance of the VLDOCRController class is used to manage the recognition process. A VLDOCRPeripheral represents the peripheral being scanned. The controller is initialized with a peripheral object.
The recognition process involves a video camera preview layer and an overlay image, both obtained from the controller. The overlay image must be precisely positioned over the preview layer for proper alignment and recognition using a frame provided by the controller.
The app creates a view hierarchy where a parent view contains two subviews (preview and overlay). The controller is configured with the size of the preview layer and it generates the appropriate frame for the overlay image view.
OCR processing begins as soon as the controller is initialized. A delegate is called with intermediate and final results. The camera capture session ends when the controller is deallocated.
View structure
Two different approaches can be used to structure views for the preview and overlay, using either a UIImageView or CALayer for the overlay image.
In the preferred view-based approach, a parent view contains two subviews, one for the preview and the other for the overlay image. The preview layer is obtained from the VLDOCRController and added as a sublayer to the preview view. Once this layer is added, no subviews of the preview view will be visible. The overlay view, typically a UIImageView, and sibling of the overlay view, contains the overlay image obtained from the VLDOCRController, positioned to the frame specified by the controller. The origin of both views is assumed to be [0,0] within their parent. The parent and preview view are typically full screen.
In the alternate approach, a single view is used. The preview layer is added to this view and an additional CALayer is created, the overlay image is set on that CALayer and it is added as another sublayer to the same view. The overlay layer’s frame must be set to the frame given by the VLDOCRController.
Initialize VLDOCRController
The VLDOCRController requires a VLDOCRPeripheral for its initializers.
Once a peripheral is obtained, construct the VLDOCRController and assign its delegate.
// Maintain a reference to the controller
var controller: VLDOCRController?
...
self.controller = VLDOCRController(ocrPeripheral: peripheral)
// Assign a delegate
self.controller.delegate = self
Preview
The camera preview layer is obtained from VLDOCRController and is added as a sublayer to a view within a view hierarchy as described under View Structure.
// Property or IBOutlet
@IBOutlet var previewView: UIView!

// Typically set up in ViewDidLoad
override func viewDidLoad() {
    if let previewLayer: AVCaptureVideoPreviewLayer = controller.previewLayer {
        previewView.layer.addSublayer(previewLayer)
Set the previewLayer’s frame to match those of its containing preview view. Typically within viewDidLayoutSubviews.
override func viewDidLayoutSubviews() {
    self.controller.previewLayer?.frame = self.previewView.bounds
Overlay in a view
An overlay image is displayed over the preview layer using a specific frame calculated by VLDOCRController. The image is obtained from the VLDOCRPeripheral used to initialize the VLDOCRController.
@IBOutlet var overlayView: UIImageView!

override func viewDidLoad() {
    // let peripheral: VLDOCRPeripheral = ...
    overlayView.image = peripheral.overlayImage()
Whenever the preview layer’s frame changes, the controller needs to be informed by invoking configureForPreviewLayerSize:. After this call, the overlayView’s frame should be set using the overlayFrame property of the VLDOCRController.
override func viewDidLayoutSubviews() {
    // Configure VLDOCRController with the current preview layer size
    self.controller.configureForPreviewLayerSize(previewLayer.bounds.size)
    self.overlayView.frame = self.controller.overlayFrame
Process results
During OCR processing, methods on a delegate conforming to the VLDOCRControllerDelegate protocol are invoked.
ocrController:didProcessResult: is invoked for each camera frame captured and provides intermediate results. The VLDOCRResult object contains the current recognized string, an object describing possible glare, and the cropped image that was associated with this incomplete result. The result string can be displayed to the user as an indication of what portion of the display is not being recognized. Depending on the peripheral, the result string may contain linefeeds representing multiple lines being recognized.
func ocrController(_ ocrController: VLDOCRController, didProcessResult result: VLDOCRResult?) {
    if let result = result {
        NSLog("Partial result \(result.resultString)")
        let resultImage = result.image
    }
}
The ocrController:didCompleteReading:image:forPeripheral:metadata: delegate method is invoked when OCR processing has completed with reasonably high confidence.
func ocrController(ocrController: VLDOCRController!, didCompleteReading record: VLDRecord!, image: UIImage!, forPeripheral peripheral: VLDOCRPeripheral!, metadata: [NSObject : AnyObject]!) {
    // Obtain fields from the record to display to the user
    if peripheral.type == VLDPeripheralType.glucoseMeter {
        if let diabetesRecord = record as? VLDDiabetes {
            let bloodGlucose: NSNumber? = diabetesRecord.bloodGlucose

            // Obtain the captured image, display to the user for verification of reading
            var verificationImageView: UIImageView
            verificationImageView.image = image
        }
    }
}
The value received from the OCR controller should be verified by the user and then submitted to the Validic server.
// After verification, queue the record and image to be uploaded to the server
VLDSession.sharedInstance().submitRecord(record, image: image)
The delegate is passed a VLDRecord subclass appropriate for the peripheral, the matching cropped preview image and additional metadata. The recognized values returned in the record should be visually validated by the user. The cropped preview image can be displayed to the user to validate the recognized values before uploading to the server.
When the user approves of the values, the record can be uploaded as described in Managing a Session.
OCR processing lifecycle
OCR processing commences when the VLDOCRController is instantiated. The camera preview session is stopped when the VLDOCRController is deallocated. OCR processing stops when the final result delegate method is invoked or when the controller is deallocated. To restart or to work with a different peripheral, construct a new VLDOCRController.
Alternate: Overlay in a CALayer
Instead of placing the overlay image within a sibling view in a view hierarchy, the overlay image can be displayed in a CALayer added to the same view containing the preview layer. A separate view for the overlay is unnecessary.
var overlayLayer:CALayer?
...
override func viewDidLoad() {
    self.overlayLayer = CALayer()
    self.overlayLayer.contents = peripheral.overlayImage()?.cgImage
    self.previewLayer.addSublayer(overlayLayer)
The overlayLayer’s frame needs to be set when the contain view’s frame changes,
override func viewDidLayoutSubviews() {
    self.controller.configure(forPreviewLayerSize:(self.controller.previewLayer.bounds.size)!)
    self.overlayLayer.frame = self.controller.overlayFrame
LifeScan
Approval Required
The LifeScan integration requires pre-approval for LifeScan's OneTouch Mobile Connectivity Kit (MCK). Please reach out to Validic Support at [email protected] if you are interested in LifeScan.
Overview
The Validic One Touch framework provides a convenience method to the Validic SDK for converting a BloodGlucoseRecord from the LifeScan MCK to a VLDDiabetes object. This framework must be used with the LifeScan OneTouch Mobile Connectivity Kit (MCK). Please reference the readme and documentation in the MCK for details on how to setup and implement it.
Setup
The LifeScan OneTouch MCK requires filling in the Privacy - Bluetooth Peripheral Usage Description key and value in the project's Info.plist.
If viewing the raw source add the NSBluetoothPeripheralUsageDescription key as displayed below.
 <key>NSBluetoothPeripheralUsageDescription</key>
 <string>Get Bluetoth readings</string>
If these values are not provided, the app will crash at runtime with an error reported to the console log.
The Validic One Touch framework requires linking to both the ValidicCore.xcframework and the LifeScan OneTouchMobileConnectivityKit.xcframework.
Using the convenience initializer
The Validic One Touch SDK adds a convenience initializer to VLDDiabetes, so that it can be instantiated with a BloodGlucoseRecord and a OneTouchDevice.
device.getGlucoseRecords(anchor: anchor, filterType: nil) { (device, anchor, records, error) in
    if (error != nil) {
        NSLog("getGlucoseRecords() for %@ received error: %@", device.name!, error!.localizedDescription)
        return
    }
    var validicRecords = [VLDDiabetes]()
    records?.forEach({ (bloodGlucoseRecord) in
        // Use convenience initializer to create VLDDiabetes from BloodGlucoseRecord
        var validicDiabetesRecord = VLDDiabetes(record: bloodGlucoseRecord, device: device)
        validicRecords.append(validicDiabetesRecord)
    })
    // Submit the records to Validic
    VLDSession.sharedInstance()?.submitRecords(validicRecords)
}
Passive Bluetooth
To enable passive data collection, call OneTouchDeviceManager.shared.connect(device) for each paired device. Add a listener to onDeviceDisconnected that calls connect each time. The manager will connect to these devices any time they are available, even in the background. Make sure a listener is attached to the OneTouchDeviceManager, so that when onDeviceConnected is received, a read can be initiated. To disable passive data collection, call OneTouchDeviceManager.shared.disconnect(device) for each paired device.
Example:
public class VLDLifeScanPassiveDemo {
    // Init
    public init() {
        OneTouchDeviceManager.shared.addListener(self)
        OneTouchDeviceManager.shared.autoClockSync = true
    }

    // passiveRead variable with enable/disable
    public var passiveRead: Bool = false {
        didSet {
            for device in deviceManager.devices where device.isPaired {
                passiveRead ? OneTouchDeviceManager.shared.connect(device) : OneTouchDeviceManager.shared.disconnect(device)
            }
        }
    }
}

extension VLDLifeScanPassiveDemo: OneTouchDeviceManagerListener {
    // Read a device when it connects and passiveRead is enabled
    public func onDeviceConnected(device: OneTouchDevice) {
        guard passiveRead else { return } // Remove this if this listener is also used for foreground reads
        if !device.isPaired { return }
        device.getGlucoseRecords(anchor: anchor, filterType: nil) { (device, anchor, records, error) in
            // Records received. Convert to VLDRecord and submit to Validic.
        }
    }

    // If passiveRead is enabled, call connect again when a device disconnects
    public func onDeviceDisconnected(device: OneTouchDevice) {
        if passiveRead {
            OneTouchDeviceManager.shared.connect(device)
        }
    }

    // Not included: other `OneTouchDeviceManagerListener` methods
}
Considerations
- The Validic native library framework for One Touch requires a license file from LifeScan, that must be provided for their SDK, and also the ValidicOneTouch.framework to function.
- Attempting to take a reading from an unpaired device can start the pairing flow. This is a feature of the OneTouch MCK and cannot be overridden.
Updated 23 days ago
Review the class documentation online:
